Skip to content
Project Medusa Sign in

Everything Medusa does

Every feature with an explanation, where to find it and pictures, sorted by topic. Where a documented comparison exists, the «Compared» button shows how Adobe InDesign, QuarkXPress and Affinity Studio handle the same thing.

No feature found.

Working together

The whole team works in one document, with no checking out and no files going back and forth.

Together in the document
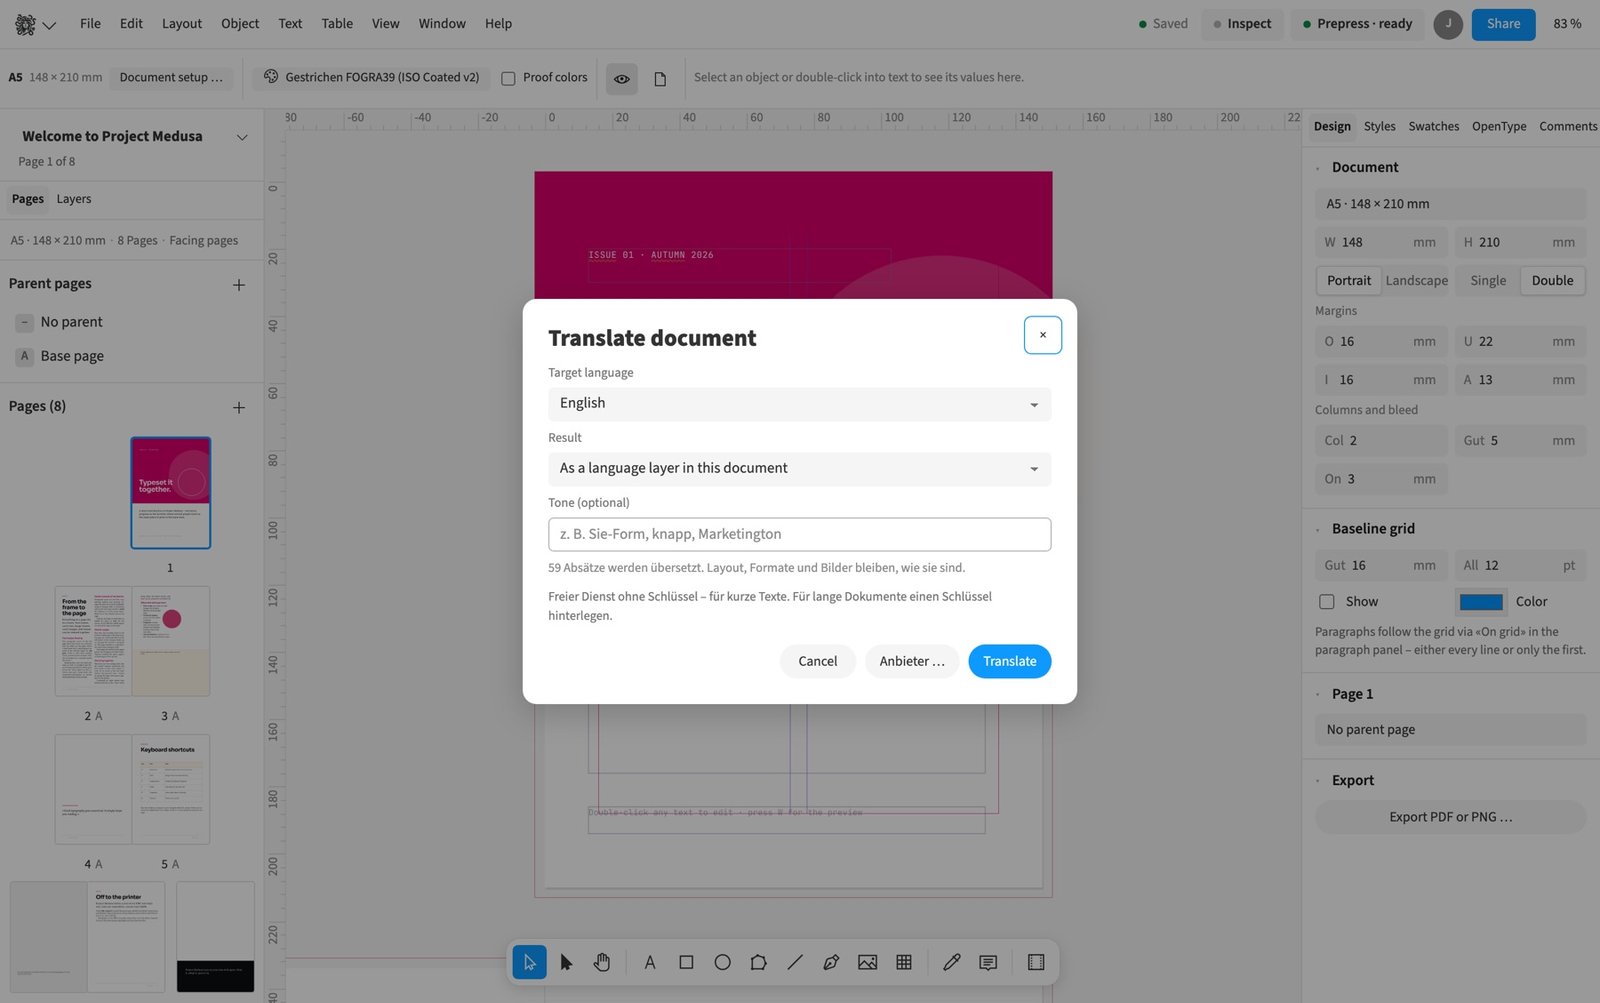
Together in the document. Mara and Luca are in the same document. Their cursors carry name and colour.

Everyone in the same document

changes appear for all at once, even mid-paragraph, with names, pointers and text cursors in their own colour

Where to find it File › Share …

You work with others in the same document at the same time, including within the same paragraph. Names, pointers, selections and text cursors use individual colours to show where everyone is working. On a magazine, an editor can revise the introduction while you set the caption. Changes appear for the others without sending files or checking them out. You can check text length and line breaks in the layout while the team works.

How to do it

  1. Open File › Share …
  2. Click Copy.
  3. Share the appropriate link and open the same document.
Compared

Simultaneous editing, same document

Vendor sources, as of 25.9.2026 · Full comparison with all sources

Chat and video chat in the document

short messages with an unread counter, picture and sound straight from browser to browser

Where to find it Chat

The chat belongs to the open document and displays a counter for unread messages. You can discuss a magazine image selection with an editor while you both look at the same page. For a conversation with picture and sound, video chat connects the browsers directly. Messages support ongoing discussion, while comments record a specific correction location. Collaboration and conversations need a connection to the shared document.

How to do it

  1. Click Chat.
  2. Write your message in the chat.
  3. Send the message and check replies in the same area.

Limits: Video chat is intended for small groups and can fail from around six people or on networks with strict connection restrictions.

Compared

Chat and video chat in the document

  • Medusa availablebrowser to browser
  • Adobe InDesign no reliable statement
  • QuarkXPress no reliable statement
  • Affinity Studio no reliable statement

Vendor sources, as of 25.9.2026 · Full comparison with all sources

Links instead of passwords

one link each for editing, copy editing, commenting and viewing

Where to find it File › Share …

You share the document through separate links for editing, copy editing, commenting and viewing. The chosen link determines the work its recipient can do. An agency can give a client a copy-editing link and its designers an editing link. Copy editors change released text and images, comment and approve while the layout stays locked. A commenting link is enough for feedback, and a viewing link for inspection.

How to do it

  1. Open File › Share …
  2. Choose the row with the required role.
  3. Click Copy.

Teams with their own storage

admins create teams and decide who edits and who only views. All members see the documents in the team's storage, and whoever leaves loses access at once

Team storage brings documents together for a team’s members. On the start page, you switch between all documents, your own and your team’s storage. A magazine editorial team can keep the current issue and documents for the next edition there. Your assigned role determines whether you can edit or view. A person who leaves the team loses access to its storage immediately.

How to do it

  1. Open the document overview on the start page.
  2. Choose your team in the storage selector.
  3. Open the required document from the list.

Limits: Shared folders, brand kits and libraries per team are not yet implemented.

Compared

Teams with shared storage

  • Medusa availableadmins create teams; members edit or only view; whoever leaves loses access at once
  • Adobe InDesign no reliable statement
  • QuarkXPress no reliable statement
  • Affinity Studio no reliable statement

Vendor sources, as of 25.9.2026 · Full comparison with all sources

Comments on the object

with @-mentions and an email to the people mentioned

Where to find it Window › Comments

You attach a comment to an object to identify the location concerned. In a catalogue, a question about an item number can sit directly on its text frame. An @-mention addresses a person explicitly rather than merely writing their name in the comment. The person mentioned receives an email if they have these notifications enabled. Replies stay with the comment and keep the correction discussion together.

How to do it

  1. Select the object concerned.
  2. Open Window › Comments.
  3. Write the comment and select the intended person after @.
  4. Send the comment.

Named versions

restore or compare, text word by word and objects new, removed or moved; one click jumps to the spot

Where to find it File › Version history …

You save a document state under your own name and find it again in version history. Before the final proofing round of a book, you can record the version sent to the copy editor. Comparison with the current document shows text changes word by word, together with new, removed or changed objects and pages. Clicking a finding takes you to the location concerned. Restoring returns the shared document to the chosen state, so this action affects everyone working on it.

How to do it

  1. Open File › Version history …
  2. Name the current state and click Save.
  3. Click Compare for a saved version.
  4. Click a finding to jump to the page.

Tips

  • Save a named version before a major proofing round.

Limits: You cannot restore a version while a page is approved and locked.

Compared

Version history and compare

Vendor sources, as of 25.9.2026 · Full comparison with all sources

Change once, current everywhere

publish a logo or an imprint once and place it in many documents. Copies follow, deliberate deviations stay

Where to find it Object › Library and source object

You publish a selection as a source object and place linked copies in other documents. An agency can reuse a logo or imprint block across several brochures this way. The copy keeps the content in the destination document and can update from the source. Text segments you explicitly designate as local overrides survive updating. You can maintain shared design elements while retaining local adjustments for a particular edition.

How to do it

  1. Select the logo or object group.
  2. Choose Object › Library and source object › Publish selection as a source object …
  3. Open the destination document and choose Object › Library and source object › Place a linked object …
Compared

Reusable objects that update

Vendor sources, as of 25.9.2026 · Full comparison with all sources

Brand kits and libraries

colours, styles, fonts, logos, workspaces and export presets for the whole team

Where to find it Window › Brand sets

Brand kits collect house colours, styles, fonts, logos, workspaces and export presets. The library stores reusable objects and styles for later documents. For an agency’s series of publications, you can choose a brand kit when creating a new document. Applying it adds missing colours and styles and overwrites entries with matching names using the kit’s settings. You can pass these resources to other people as files so they use the same design rules.

How to do it

  1. Open Window › Brand sets.
  2. Select the brand kit you need.
  3. Click Apply.

Limits: Brand kits and libraries live in the browser and do not yet form automatically synchronised team storage.

Flat plan for production

status and owner per page, a warning when a finished page still changes, reset for the next edition

Where to find it Layout › Flatplan …

The flatplan shows production page by page with section, owner and status. For a club magazine, you can record which pages are still in progress and which are ready for proofing. When you mark a page as finished, Medusa records its state. If its content changes afterwards, a warning appears in the plan and on the page. For the next issue, you reset production status and reuse the plan.

How to do it

  1. Open Layout › Flatplan …
  2. Select one or more pages in the plan.
  3. Enter the details for each page under Section and Assigned to.
  4. Choose a state such as In progress, Proofing or Done.
  5. Click Set.

Tips

  • The Done status in the flatplan does not replace locked page approval.
Compared

Flatplan, status and assignees

Vendor sources, as of 25.9.2026 · Full comparison with all sources

Keep working offline

installable as an app, offline documents live in the browser and can be shared later

Where to find it Offline

You can install Medusa as an app and edit documents in the browser without a network connection. On the train after a book meeting, for example, you can continue adjusting text and image crops. Offline documents retain uploaded images and fonts for reopening. PDF export, packaging and preflight use these local files. Once connected again, you can put the document online through the sharing dialog and then share its links.

How to do it

  1. Create a document in the Offline area of the start page.
  2. Edit it and upload the images and fonts you need.
  3. Once connected, open File › Share …
  4. Click Put on the server.

Limits: Offline documents exist only in this browser on this device, and collaboration, comments, video chat and links require an online connection.

Compared

Working offline

Vendor sources, as of 25.9.2026 · Full comparison with all sources

Tested with 20 people in one document at the same time

not a single change was lost

The documented multi-user test had 20 people working in one document at the same time. No change was lost during that test. For a magazine editorial team, this provides a reference for several contributors working on the same issue. Names, coloured text cursors and ongoing transmission of changes help identify everyone’s work. The number describes the tested case and is not a guarantee for every connection or document size.

Proofing & approval

Clients correct in the layout themselves. They need a link and no account.

Copy editing and approval
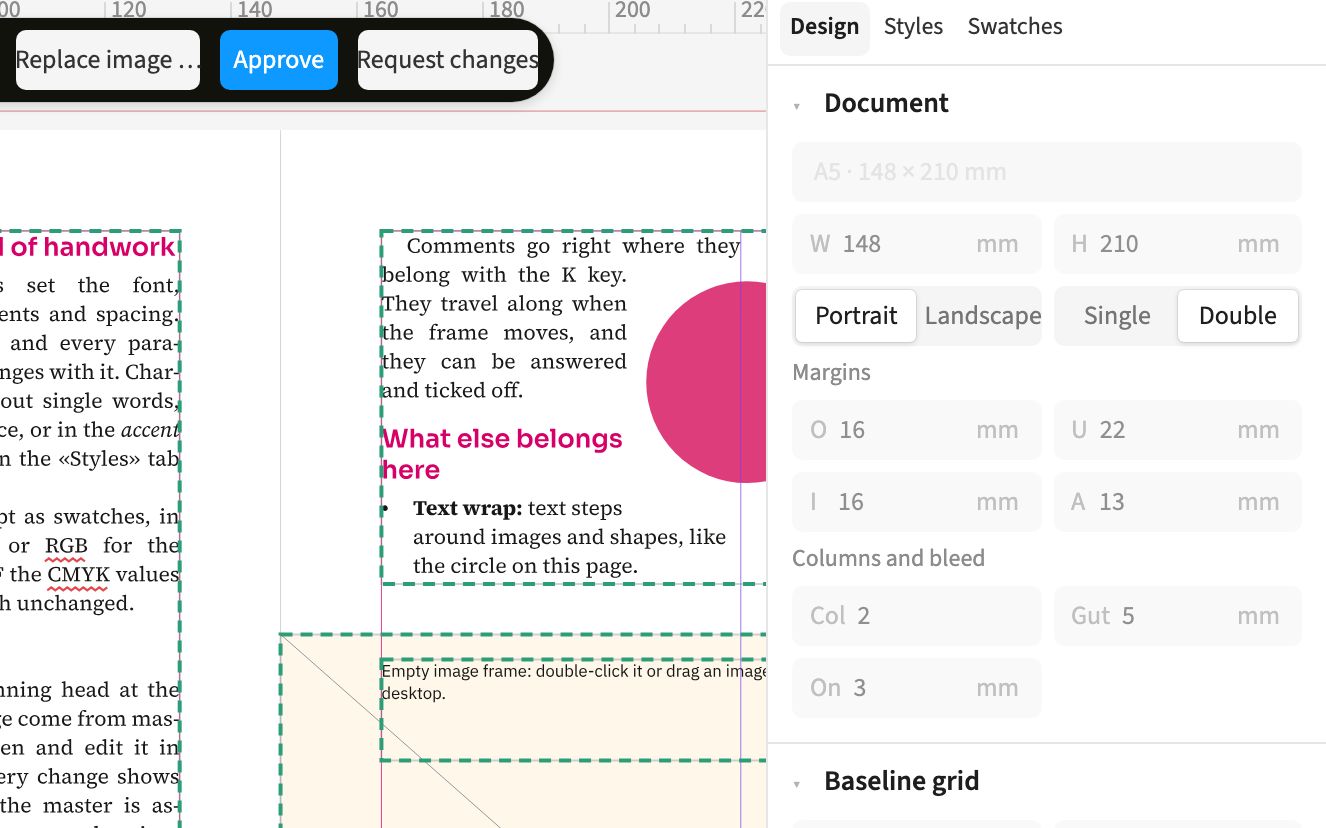
Copy editing and approval. Clients edit text in the document, approve or request changes, without an account.
Copy-editing link
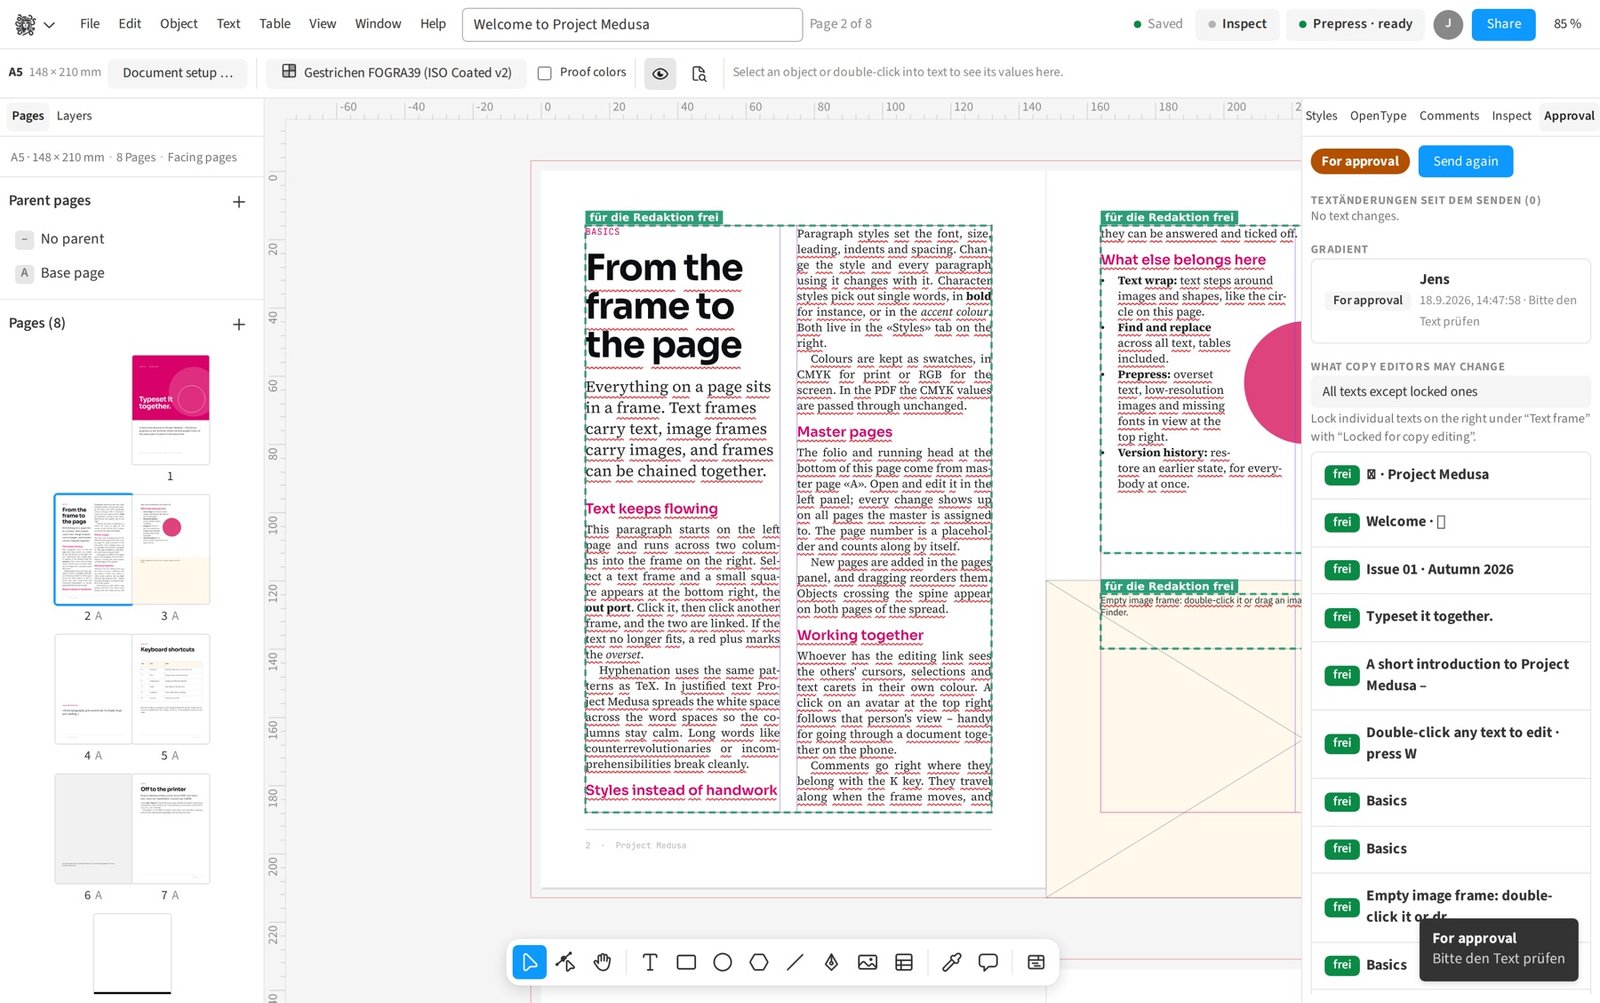
Copy-editing link. The texts are open for copy editing; on the right, what the client has changed since sending.

Clients correct without an account

one link is enough to change text in the locked layout, comment and approve

Where to find it File › Share …

You give clients a copy-editing link so they can correct directly in the layout without an account. You enable opening without sign-in and decide which frames are open for copy editing. For a brochure, clients can update names, dates and captions themselves. Frame positions and page design remain locked while text recomposes. Comments and approval stay in the same document, so you see questions alongside the corrected typesetting.

How to do it

  1. Open the relevant text or image frames for copy editing.
  2. Open File › Share …
  3. Enable Open without account (clients need no sign-in).
  4. Copy the link under Copy editing and approval and share it.
Compared

Client edits text in layout, no account

  • Medusa available“Edit and approve”, images too; layout stays locked; an editorial link per person for a section or single pages, changes carry the link’s name
  • Adobe InDesign missingInCopy on the web needs a (free) Adobe account↗ Adobe: Edit with InCopy on the web (beta)
  • QuarkXPress no reliable statement
  • Affinity Studio no reliable statement

Vendor sources, as of 25.9.2026 · Full comparison with all sources

Track changes

inserted text carries name, time and colour, deleted text stays as a mark; accept or reject one by one, per person or all at once; PDF and print show the final version

Where to find it Edit › Proofing and Approval › Track changes

You enable change tracking for the document to record text edits with name, time and colour. Inserted text appears underlined, and deleted text remains as a mark at its location. During a magazine’s final editing round, you can distinguish contributors’ edits and accept or reject them individually or by person. Composition already uses the final version throughout. PDF and print also show the final version without revision marks. Tracking applies to text edits made through a copy-editing link too.

How to do it

  1. Choose Edit › Proofing and Approval › Track changes.
  2. Have the text corrected in the document.
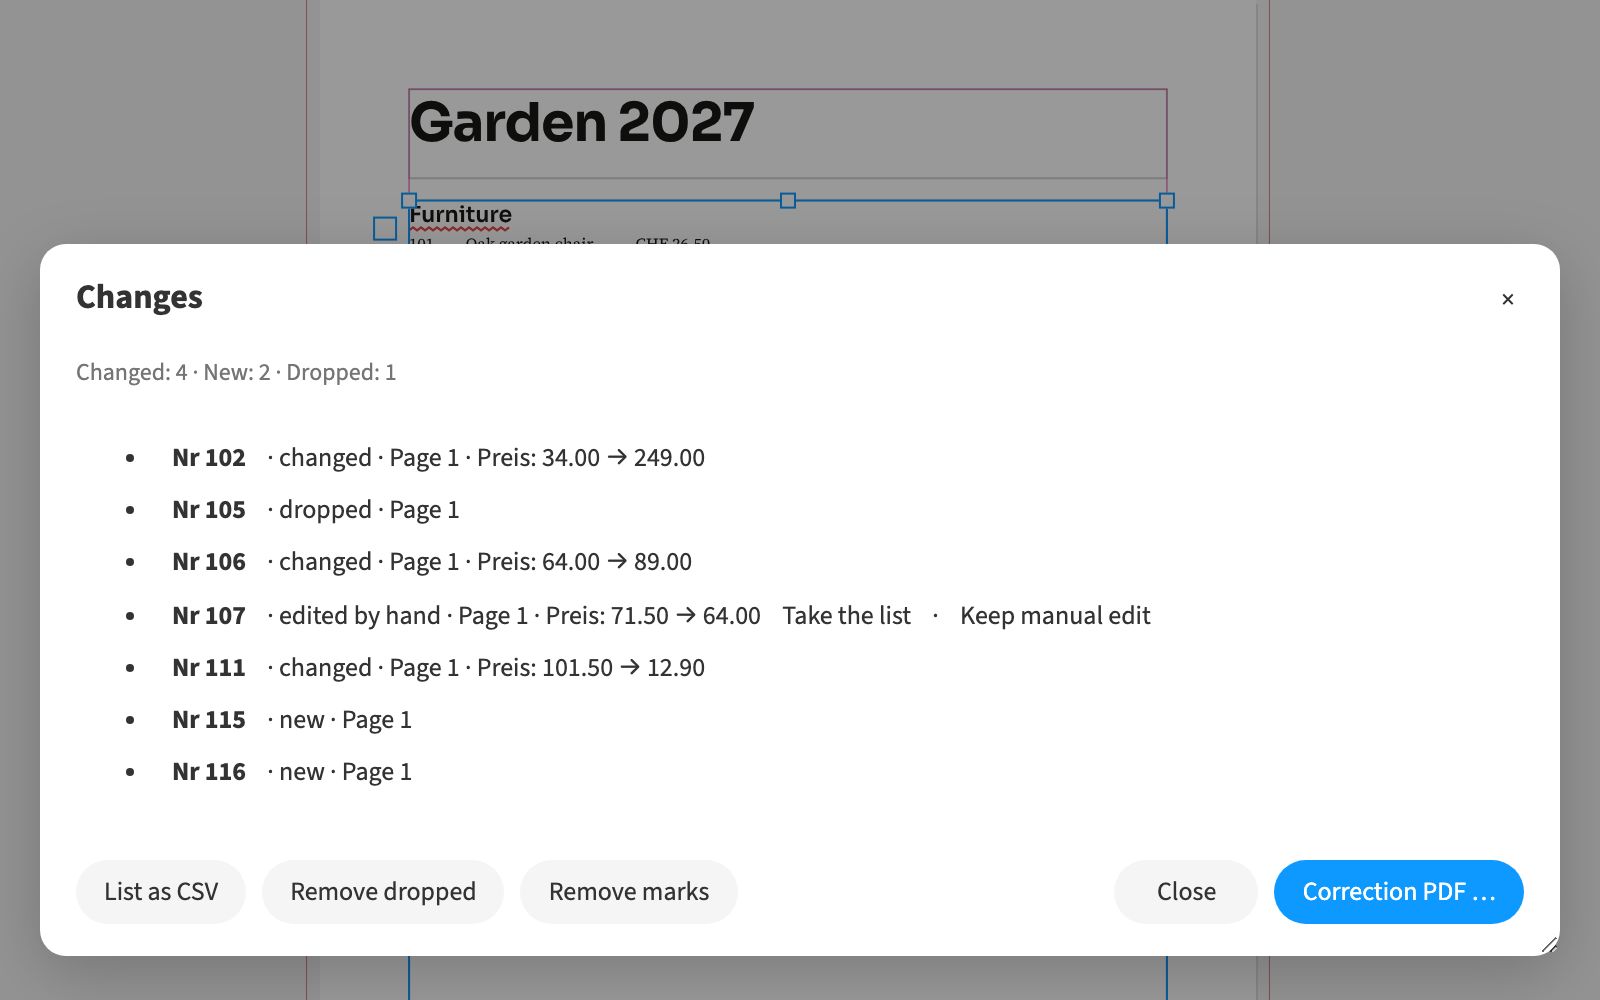
  3. Open Window › Changes.
  4. Review the edits and accept or reject them.
Compared

Track changes

Vendor sources, as of 25.9.2026 · Full comparison with all sources

Take in PDF corrections

annotations from a marked-up PDF arrive as comments in the right place, comments go out as PDF notes, for everyone without Medusa too

Where to find it Edit › Proofing and Approval › Import Comments from PDF …

You import annotations from a corrected PDF as comments in the layout. Medusa brings supported notes, highlights, underlines, strikeouts and insertion marks to the mapped location with author and date. A print shop can collect feedback from a proof without typing each annotation again. Reimporting known annotations does not create duplicate comments. In the other direction, you export open or all comments as PDF notes for people without Medusa. You make the actual text correction after reviewing the comment.

How to do it

  1. Choose Edit › Proofing and Approval › Import Comments from PDF …
  2. Select the corrected PDF proof.
  3. Check the summary and the imported entries in Comments.

Tips

  • For PDF notes, use output without PDF/X-4 and check Comments as annotations.

Limits: Import does not change text automatically, and PDF/X-4 omits exported comment notes.

See what the client changed

everything since sending at a glance; through the copy-editing link clients can also swap images in released frames

Where to find it Edit › Proofing and Approval › Review and approval

The text comparison shows what has changed since you sent the document for approval. For an agency brochure, you can assess client edits against the version you sent. Copy editors can also replace images if you open the corresponding image frames for them. A double-click or the replacement command loads the new image into the existing frame. The frame’s position, size and shape remain, preserving the agreed page design.

How to do it

  1. Open Edit › Proofing and Approval › Review and approval.
  2. Review the text comparison since sending.
  3. For an image replacement, open the copy-editing link and double-click the released image frame.
  4. Choose the new image and check its crop.

Editorial link per person

a link of its own for a section or single pages; text and images only there, changes carry the link's name, each link can be revoked on its own

Where to find it File › Share …

You create named copy-editing links for particular people or sections. A link covers selected pages or a section from the flatplan. For a club magazine, the sports editor can edit text and released images on their pages while other sections remain outside their scope. Changes carry the name of the corresponding link for attribution. You can revoke each link individually without reissuing all the other copy-editing links.

How to do it

  1. Open File › Share …
  2. Create a named copy-editing link.
  3. Choose the pages or section for this link.
  4. Copy the generated link for the intended person.
Compared

Client edits text in layout, no account

  • Medusa available“Edit and approve”, images too; layout stays locked; an editorial link per person for a section or single pages, changes carry the link’s name
  • Adobe InDesign missingInCopy on the web needs a (free) Adobe account↗ Adobe: Edit with InCopy on the web (beta)
  • QuarkXPress no reliable statement
  • Affinity Studio no reliable statement

Vendor sources, as of 25.9.2026 · Full comparison with all sources

Everyone fills in their own card

one link per person from the list, live preview, upload their own photo, approve; links with an expiry date, locked fields, a record of corrections

Where to find it Data › Client form …

From a data list, you generate a separate link for each person to correct their card. Each person edits the designated fields, sees a live preview and can upload their own photo. A print shop can proof business cards for a club without managing a separate correction letter for every member. You set locked fields and link expiry and keep the correction record with the data. Once approved, the card stays locked until you reopen it. For output, you can filter the approved records.

How to do it

  1. Load the data list and map the fields in the layout.
  2. Choose Data › Client form …
  3. Set editable and locked fields and the expiry date.
  4. Generate the personal links, then review corrections and approvals.

Limits: Photo uploads accept JPEG or PNG up to 10 MB.

Compared

Client form: one link per person

  • Medusa availableeach person fills their card, approves
  • Adobe InDesign no reliable statement
  • QuarkXPress no reliable statement
  • Affinity Studio no reliable statement

Vendor sources, as of 25.9.2026 · Full comparison with all sources

A proof marked as a proof

every sheet carries document, page, date and “not for print” in the margin

Where to find it File › Print … · ⌘P

The proof carries the document name, page, date and a “not for print” notice in the sheet margin. A print shop can use this to distinguish a review copy from a production file. The marking appears on every output sheet and remains visible when pages are passed around separately. You can distribute this proof for checking text and design. For the final print file, use regular PDF export with the appropriate output presets.

How to do it

  1. Choose File › Print …
  2. Choose the page range and enable “Proof” line on every sheet.
  3. Generate the proof and check its margin marking.

Approval per page

clients approve individual pages or everything, approved pages lock until you lift the approval. The rest stays editable, a version is created and a mail goes out; with several reviewers each person agrees individually, pages lock only when all have agreed

Where to find it Edit › Proofing and Approval › Review and approval

Clients can approve individual pages, the selected spread or the entire document. Medusa locks approved pages and leaves the rest editable. For a brochure, you can retain signed-off pages while final text on other pages is still being revised. Approval creates a version and can trigger an email to the responsible person. With several reviewers, each agrees through their own link and pages lock only after all approvals. You lift an approval explicitly before editing the affected pages again.

How to do it

  1. Open Edit › Proofing and Approval › Review and approval.
  2. Send the document for approval and specify the reviewers.
  3. Have reviewers choose and confirm the page range under Approve.
  4. Check the locked pages and use Lift approval when required.

Limits: Changes to master pages, shared styles, swatches and customer-form data can still affect approved pages.

Compared

Approval by several reviewers

  • Medusa availableeach person agrees through their own link; pages lock only when all have agreed
  • Adobe InDesign no reliable statement
  • QuarkXPress no reliable statement
  • Affinity Studio no reliable statement

Vendor sources, as of 25.9.2026 · Full comparison with all sources

Typesetting & typography

Screen and PDF show the same typesetting: one engine for editor, image and print.

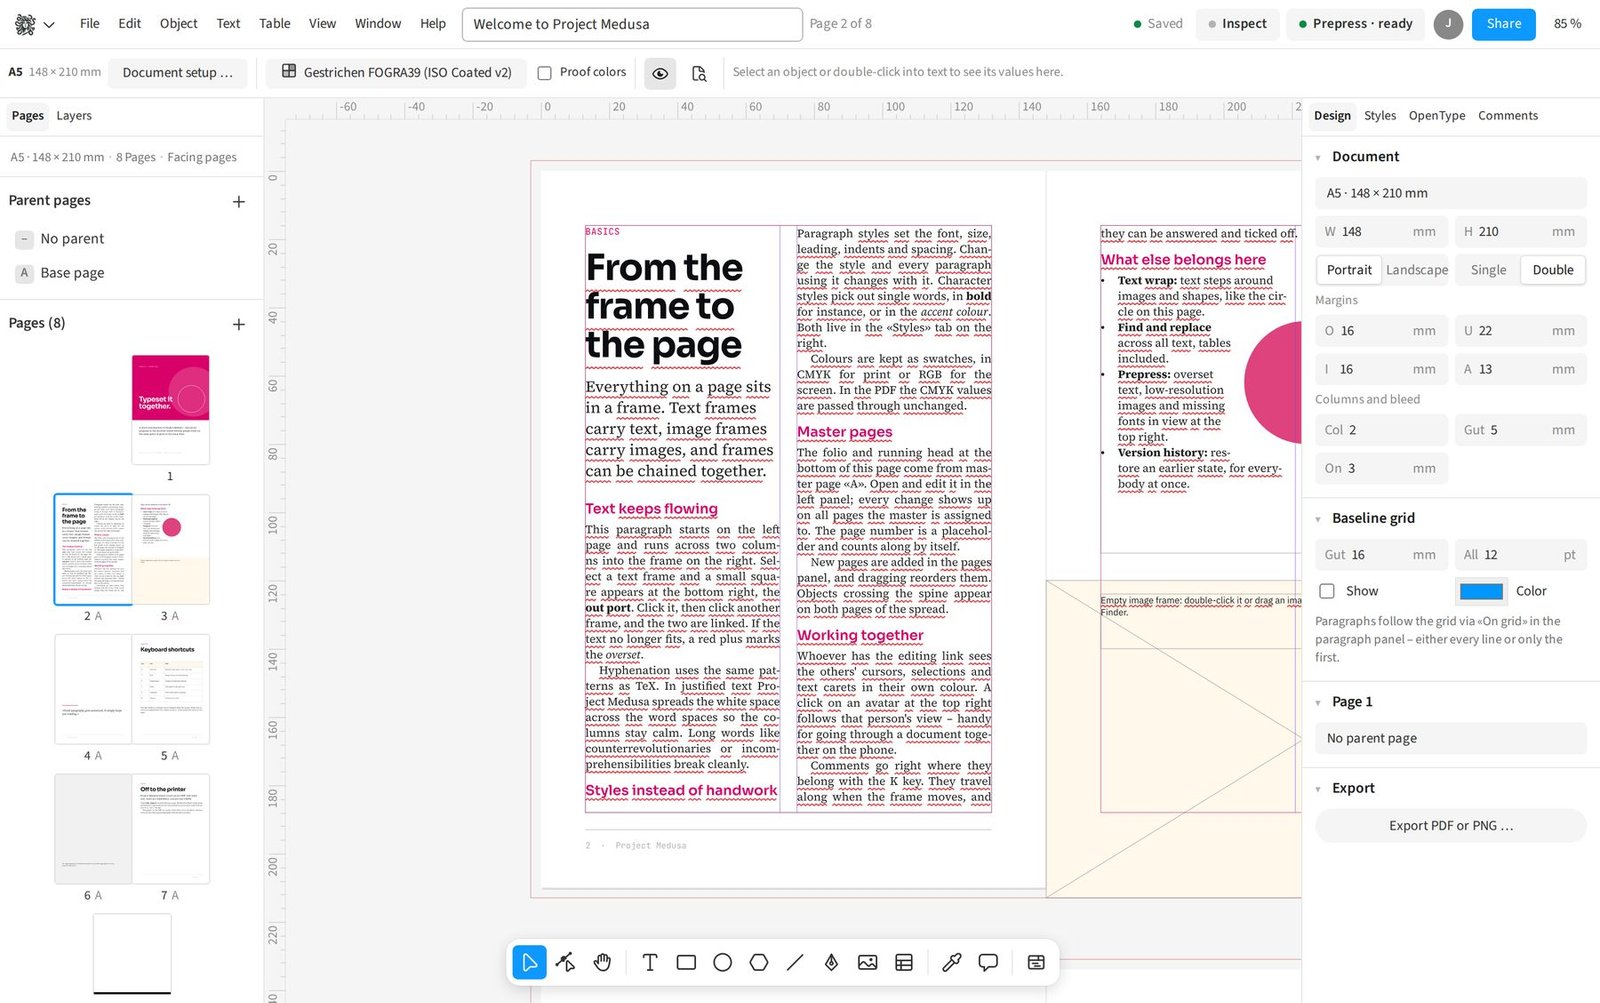
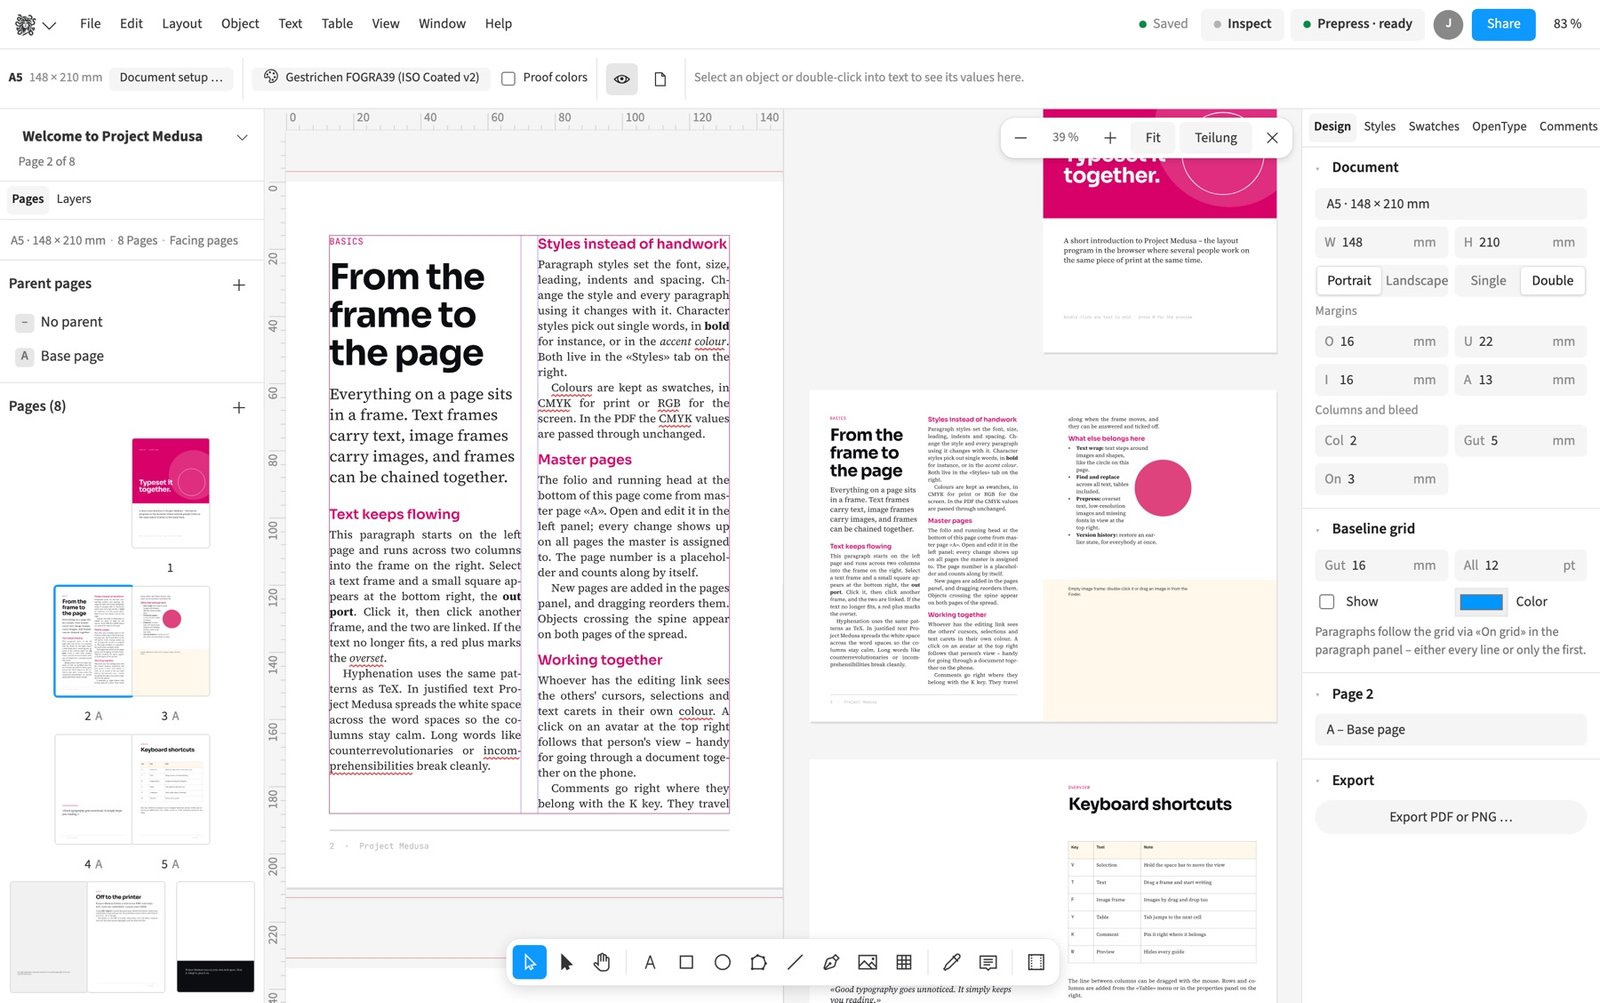
The editor
The editor. Type area, master pages and panels. Top right you see who else is in the document.
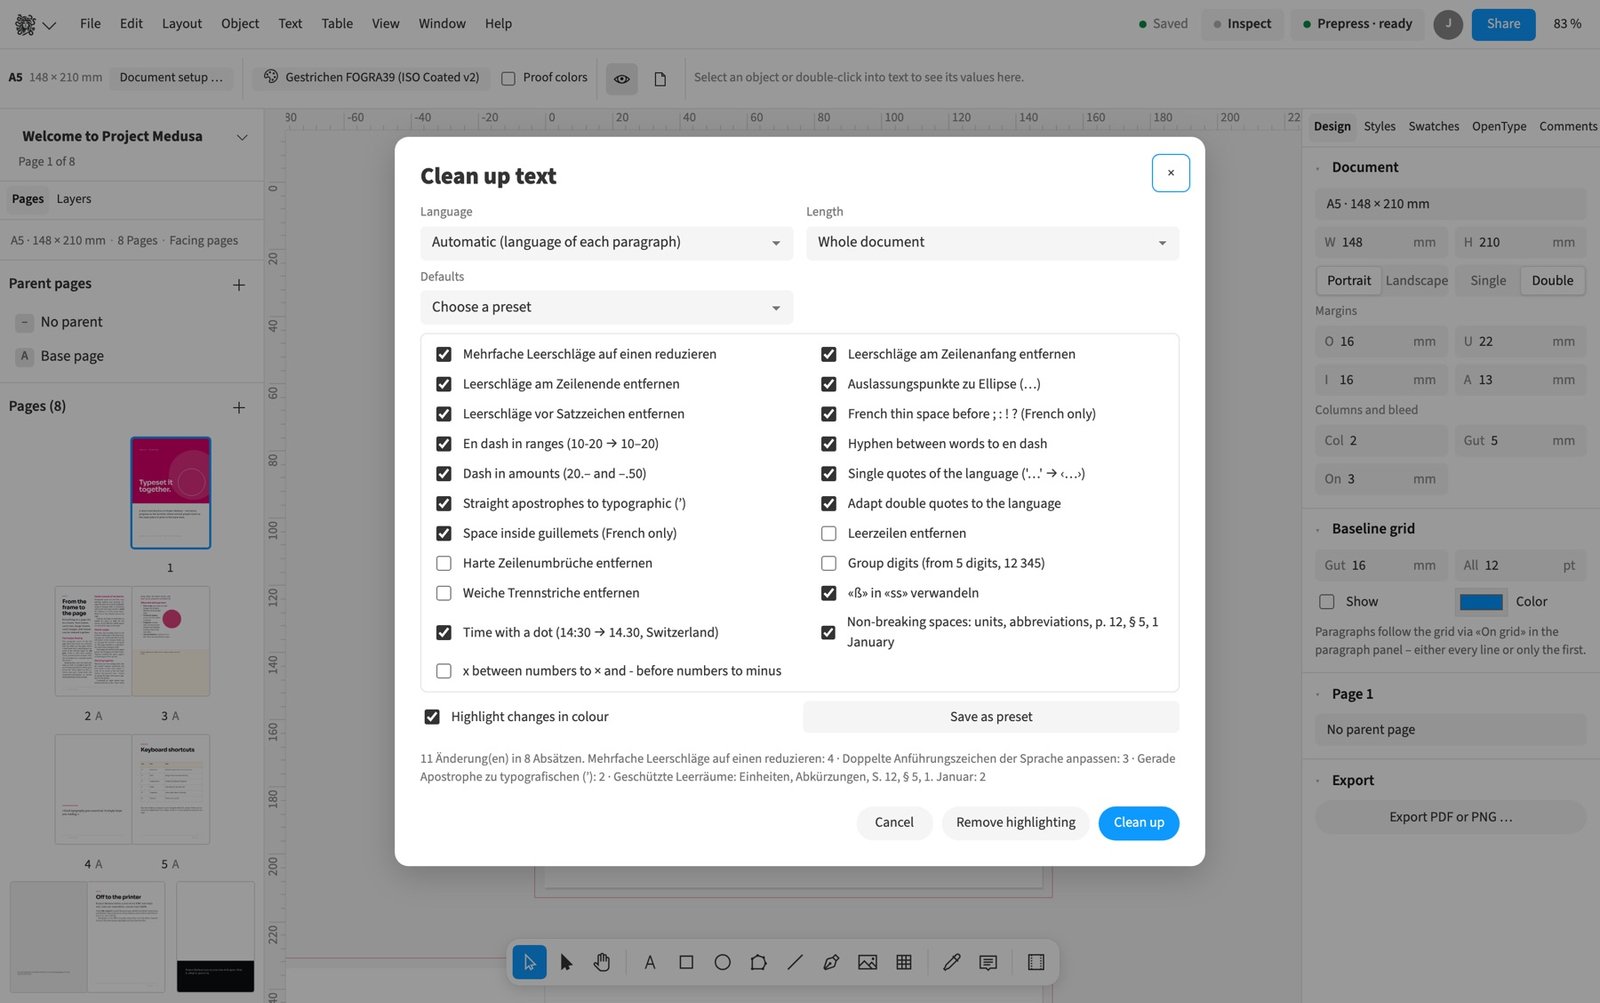
Cleaning text
Cleaning text. Micro typography by language: quotation marks, dashes, protected spaces, with presets and colour highlighting.
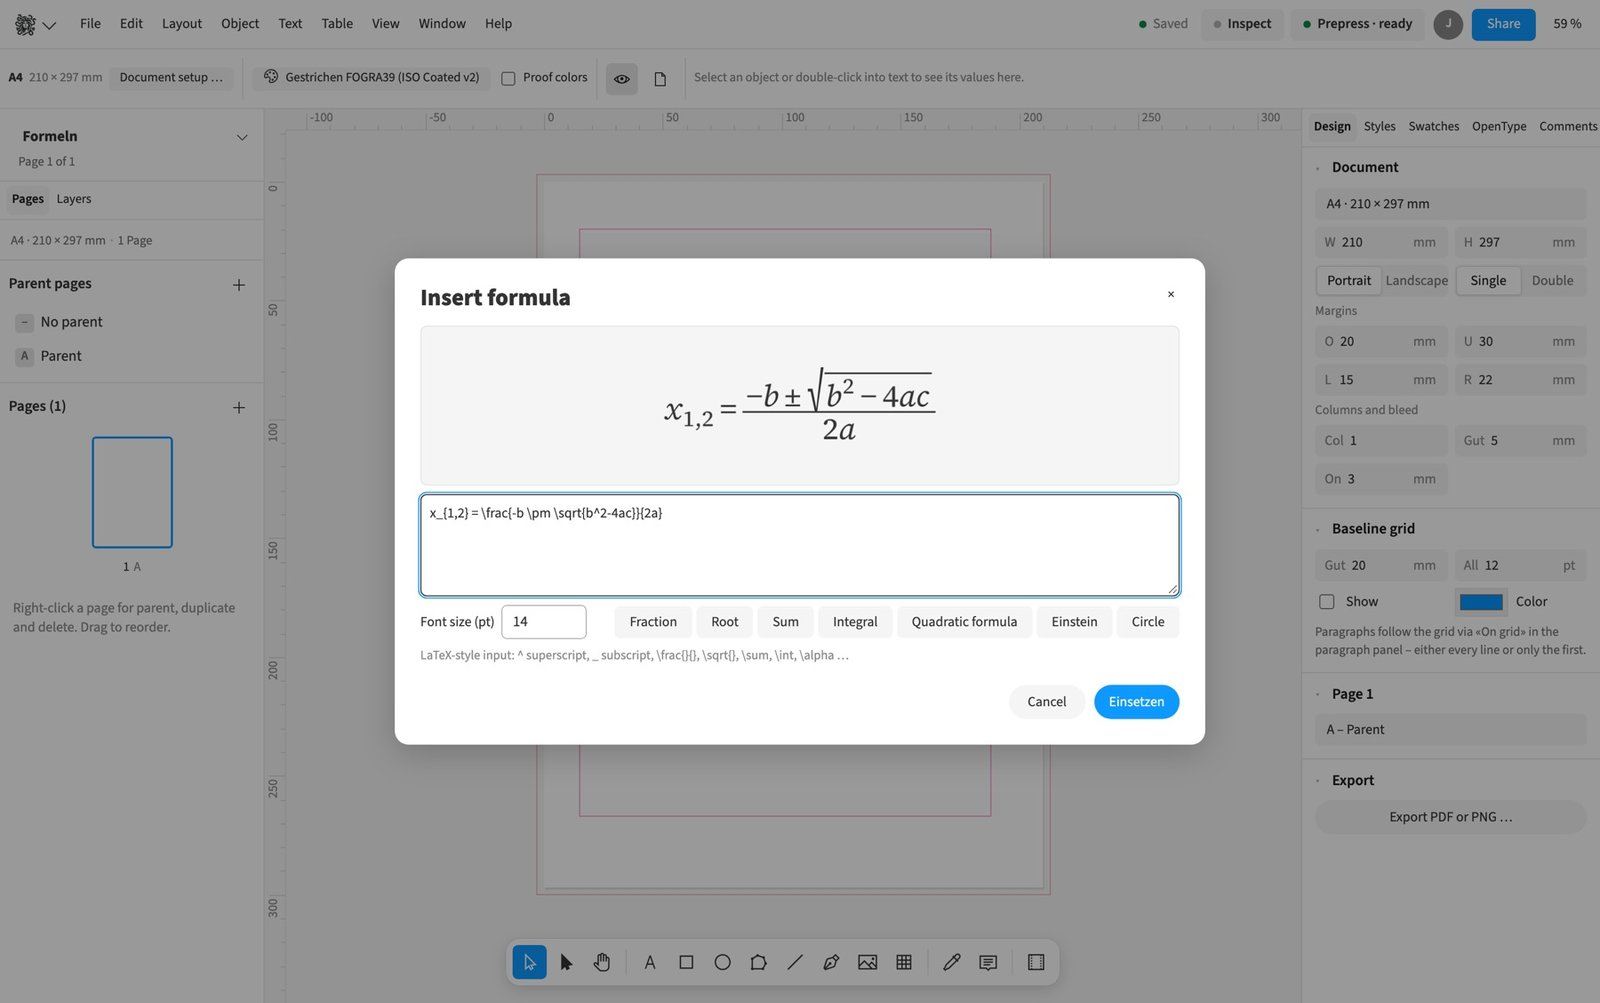
Formula setting
Formula setting. LaTeX-style input, preview as you type, vector output in the PDF.

Styles that build on each other

paragraph, character and object styles with based-on and next style, line styles, nested styles and GREP styles, arranged in collapsible groups

Where to find it Window › Styles

Paragraph, character and object styles store recurring design rules in the document. Based-on styles let related styles inherit settings, while next styles prepare the following style assignment. For a book, you can maintain body text, opening paragraphs and subheadings as a related family. Line styles, nested styles and GREP styles apply character styles by line, text segment or pattern. Collapsible groups organise larger style collections so you can find a section’s styles together.

How to do it

  1. Open Window › Styles.
  2. Create a paragraph, character or object style, or edit an existing one.
  3. Set the based-on and next styles, then apply the style to the selection.

Tips

  • Store recurring emphasis in character styles before defining GREP styles.
Compared

Nested and GREP styles

Vendor sources, as of 25.9.2026 · Full comparison with all sources

Justification down to the detail

word and letter spacing, glyph scaling, paragraph composer, balanced ragged lines, hyphenation with preview

Where to find it Font › Justification and Hyphenation … · ⌘⇧⌥J

You control justification through word spacing, letter spacing and glyph scaling. The paragraph composer considers the entire paragraph, while the single-line composer decides line by line. For narrow magazine columns, you can coordinate spacing and hyphenation instead of changing individual lines with spaces. The preview shows the effect of the settings before applying them. Balanced ragged lines help with short paragraphs whose line lengths you want to bring closer together. The editor and PDF use the same typesetting engine.

How to do it

  1. Select the text you want to edit.
  2. Open Font › Justification and Hyphenation …
  3. Choose the composer under Composer and adjust spacing and hyphenation.
  4. Check the line breaks on the page.

Tips

  • Compare the paragraph and single-line composers on the same paragraph.
Compared

Paragraph composer

  • Medusa availablewhole paragraph, also with tabs, drop caps and very long paragraphs
  • Adobe InDesign available↗ Adobe: World-Ready Composer overview
  • QuarkXPress no reliable statement
  • Affinity Studio no reliable statement

Vendor sources, as of 25.9.2026 · Full comparison with all sources

Calm margins, clean register

optical margin alignment with a reference size and your own rules per character, baseline grid for all lines or only the first, a grid per frame

Where to find it Window › Properties

Optical margin alignment lets suitable characters extend beyond the text edge. You set the reference size and can define left and right alignment values for individual characters. On book pages with many quotation marks, this avoids visually indented text edges. The baseline grid aligns every line or only the first line of a paragraph to the register. A frame-specific grid allows a different increment for an information box alongside body text. These settings affect actual composition and therefore PDF output too.

How to do it

  1. Select the text frame.
  2. Open Window › Properties.
  3. Enable Optical margin alignment and set Size.
  4. Open Optical margin rules … for custom character values.
  5. Set the paragraph’s grid alignment in Paragraph & Character.

Limits: Custom optical margin rules are not transferred through IDML.

Compared

Optical margin alignment

Vendor sources, as of 25.9.2026 · Full comparison with all sources

Kerning

metric from the font's own pairs (even across style changes), optical, or by hand with Alt+arrow

Where to find it Window › Properties › More

Metric kerning uses the font’s kerning pairs, including across style changes. Optical kerning calculates spacing from the glyph shapes. For a large magazine headline, you can additionally adjust individual letter pairs by hand. The manual value applies at the cursor between the two characters and supplements the chosen method. You can correct a conspicuous pair without changing tracking for the entire headline. Typesetting carries the spacing through to the PDF.

How to do it

  1. Place the cursor between the two characters.
  2. Open Window › Properties.
  3. Open More in the text section and choose the kerning method.
  4. Adjust the value under Kern or with ⌥← and ⌥→.

Tips

  • Use ⌥← and ⌥→ to adjust the pair at the cursor.

Characters as in professional typesetting

horizontal and vertical scale, skew, stroke, character background, underline and strikethrough with weight, offset and colour, true and synthetic small caps

Where to find it Font › Character

You can scale characters horizontally or vertically, skew them and give them a stroke or background. Underline and strikethrough have their own weight, offset and colour settings. In a magazine, you can design a text emphasis and control its distance from the type. For small caps, Medusa uses the font’s genuine forms when available and synthesises them otherwise. The settings belong to the text and can be reused through character styles. The editor and PDF set the same character shapes and positions.

How to do it

  1. Select the text you want to edit.
  2. Open Window › Text › Paragraph & Character.
  3. Set the character values and the emphasis you need.
  4. Check the line breaks on the page.

Everything about characters and paragraphs in one panel

OpenType, variable axes, tabs, drop caps, breaks, nested styles and GREP styles

Where to find it Font › Character

The Paragraph & Character panel collects settings for the current text selection. It provides character values, OpenType, variable axes and advanced paragraph settings. During book production, you can change a paragraph’s indent and then adjust its drop cap or keep options. Expandable groups keep tabs, nested styles and GREP styles available in the same place. The panel works on the selected text, letting you check its effect directly on the page.

How to do it

  1. Select the text you want to edit.
  2. Open Window › Text › Paragraph & Character.
  3. Expand the required group and change its values.
  4. Check the line breaks on the page.

Text frames made to measure

fixed or flexible columns, inset per side, vertical justification, first baseline, column rules, auto-size to the text

Where to find it Object › Text Frame Options … · ⌘B

Text frame options control columns, insets and vertical text distribution. You can choose fixed or flexible column widths and set the inset separately on each side. In a book’s information box, this keeps text away from the border and lets you position its first baseline. Column rules separate the columns, and a frame-specific baseline grid allows a different line increment. Auto-sizing adjusts the frame to its text. Check the text flow afterwards because changed widths and insets affect composition.

How to do it

  1. Select the text frame.
  2. Open Object › Text Frame Options …
  3. Set columns, insets and First baseline.
  4. Check the line breaks on the page.

Tips

  • ⌘B opens text frame options for the selection or the frame containing the cursor.

Breaks under control

break characters for column, frame, odd and even page, keep paragraphs together, no widows and orphans, paragraphs spanning columns or in a split column

Where to find it Font › Paragraph

You control text flow with break characters and rules that keep related paragraphs together. A break can lead to the next column, next frame or next even or odd page. In a book, you can place a chapter opening on the correct page and keep a heading with its following paragraph. Widow and orphan controls prevent unwanted isolated lines at column boundaries. For magazine headings, you can span a paragraph across columns or split a column for it. These rules also determine composition in output.

How to do it

  1. Select the text you want to edit.
  2. Open Window › Text › Paragraph & Character.
  3. Set the rules for related lines and paragraphs in Break.
  4. If needed, insert a specific break through Font › Insert break character.

Drop caps, paragraph rules, paragraph shading and borders, per column and across frame boundaries too

Where to find it Font › Paragraph

Drop caps enlarge the beginning of a paragraph over several lines. Paragraph rules, shading and borders add design directly to the paragraph. In a magazine, you can mark an article opening or distinguish a note within running text. The design belongs to the paragraph and follows its composition, including into another column or frame. You can store the rules in paragraph styles to maintain several boxes or article openings together.

How to do it

  1. Select the text you want to edit.
  2. Open Window › Text › Paragraph & Character.
  3. Open Drop cap or Shading and border and set the values.
  4. Check the line breaks on the page.

Tabs with a ruler and leaders; bullets and numbering with your own character, number formats, five levels and a start number

Where to find it Font › Tabs

You place tabs on a ruler, drag them to new positions and add leaders when needed. In a publisher’s list, you can align titles and page numbers at fixed positions. Bullets and numbering support custom characters, number formats and five levels. A start number and level patterns help with structured book sections or multilevel instructions. Numbering belongs to the paragraph, so you do not need to type a fixed number into each line.

How to do it

  1. Select the text you want to edit.
  2. Open Window › Text › Paragraph & Character.
  3. Open Tabs and place the positions on the ruler.
  4. For lists, set the character, level and numbering through Font › Bullets and numbering …

Tips

  • Drag a tab down off the ruler to remove it.

Text around the real shape

wrap around paths, ellipses, images in a shape, groups and the alpha channel of cut-out images, with distance, side and a contour you can edit point by point; type on a path

Where to find it Object › Text wrap · ⌘⇧⌥W

Text wrap follows an object’s actual shape. It takes account of paths, ellipses, groups, images in shapes and the alpha channel of cut-out images. In a magazine article, text can therefore follow a cut-out portrait. You set the offset and wrap side and can edit the contour point by point. Type on a path instead places characters along a line or curve, for example for a circular label. Both designs affect the typesetting in output.

How to do it

  1. Select the object the text should wrap around.
  2. Choose Object › Text wrap.
  3. Set the wrap type, offsets and side.
  4. Check the line breaks on the page.

Limits: Text wrap in tables and edge detection without an alpha channel are unavailable, and the editable contour supports corner points only.

Compared

Text wrap around image shape

  • Medusa availablearound the real shape: paths, ellipses, images in a shape, groups and the alpha channel of cut-out images; distance, side, contour editable point by point
  • Adobe InDesign available
  • QuarkXPress available
  • Affinity Studio available

Vendor sources, as of 25.9.2026 · Full comparison with all sources

Ligatures only where they fit

a colour change breaks them up, tracked text sets without them

Medusa composes ligatures according to the properties of the characters involved. If colour changes inside a possible ligature, composition breaks it apart and preserves each character’s colour. Text with tracking also sets without ligatures so that the requested spacing stays visible. For a coloured magazine headline, you therefore do not need replacement characters to preserve the emphasis. Kerning to neighbouring characters remains. The rule applies to composition in both the editor and PDF.

Conditional text

show or hide passages by condition; hidden text is neither composed nor exported

Where to find it Window › Text › Conditional text

You assign conditions to passages and switch their visibility in the document. Named condition sets store combinations of several conditions. In a publisher’s brochure, you can keep regional details or short and long wording within the same text. Hidden passages occupy no space in composition, so the remaining text closes up. They are also absent from PDF, PNG and SVG output. Check which condition set is active before each output.

How to do it

  1. Select the text you want to edit.
  2. Open Window › Text › Conditional text.
  3. Create a condition and assign it to the selected passage.
  4. Turn the condition on or off and check text flow.

Tips

  • Check overset again after switching conditions.
Compared

Conditional text

Vendor sources, as of 25.9.2026 · Full comparison with all sources

Find and replace by text, style and font, with GREP, back references and presets for double spaces, dates or phone numbers too; save a search as a sequence, “Tidy up typography” puts double spaces, ellipses and dashes in order in one step

Where to find it Edit › Find and replace … · ⌘F

You search for text, styles or fonts and replace matches selectively. GREP adds patterns and back references, for example for phone numbers written in different ways in a directory. Presets help with recurring tasks such as double spaces or dates. Several replacements can be saved as a sequence for the next edition. The typography cleanup command corrects double spaces, ellipses and dashes in one step. Check individual matches before applying a replacement to the entire text.

How to do it

  1. Open Edit › Find and replace …
  2. Enable GREP if needed, or open the style and font criteria through Format.
  3. Enter the search value and replacement and inspect a match.
  4. Replace the required matches or save the search as a sequence.

Tips

  • ⌘F opens Find and Replace.

Formulas in LaTeX notation

fractions, roots, sums, integrals; preview as you type, vectors in the PDF

Where to find it Object › Place › Formula …

You enter a formula in LaTeX notation and see a preview as you type. Fractions, roots, sums and integrals can therefore be placed as typeset formulas in the document. In a textbook, you can edit an equation without first importing it as an image from another program. You can adjust the formula’s font and size in the layout. In the PDF, the formula remains a vector representation, so its lines and characters do not turn into pixels when enlarged.

How to do it

  1. Choose Object › Place › Formula …
  2. Enter the formula in LaTeX notation.
  3. Check the preview and click Place.
Compared

Math typesetting

Vendor sources, as of 25.9.2026 · Full comparison with all sources

Text count at a glance

characters, lines and overset, standard lines of 55 and standard pages of 1800 characters, plus a story mode for writing without layout

Where to find it View › Story mode · ⌘⌥Y

Text count shows characters with and without spaces, words, lines and paragraphs for the selection, story and document. Overset identifies text that no longer fits in the available frames. For planning a book manuscript, Medusa also calculates standard lines of 55 and standard pages of 1800 characters including spaces. In story mode, you write in the story without using page design as the editing surface. Clicking overset there selects the text that does not fit. You can assess the length of a cut and then return to page composition.

How to do it

  1. Select the text frame.
  2. Open Window › Properties.
  3. Read the values under Text amount and, if needed, open View › Story mode.

Limits: Hidden conditional text, footnotes, field contents and soft hyphens are excluded from the text count.

Show hidden characters, a special-characters menu with every space and “Indent to here”, a glyph panel

Where to find it Font › Show hidden characters · ⌘⇧⌥H

Showing hidden characters makes spaces, paragraph ends and other control characters visible in the text. In a book manuscript, you can spot a tab where only a word space should be. The special-character and whitespace menus insert the intended characters at the cursor. “Indent to here” makes following lines start at the inserted position. The glyph panel shows the selected font’s characters and helps with those missing from the keyboard. The helper display is for editing and does not belong to the printed text.

How to do it

  1. Choose Font › Show hidden characters.
  2. Place the cursor at the required position.
  3. Choose a character through Font › Insert special character or Insert white space.
  4. For additional characters, open Font › Glyphs.

Fonts & languages

Your own fonts, many scripts, and Medusa sets type by the rules of each language.

Variable fonts on the text
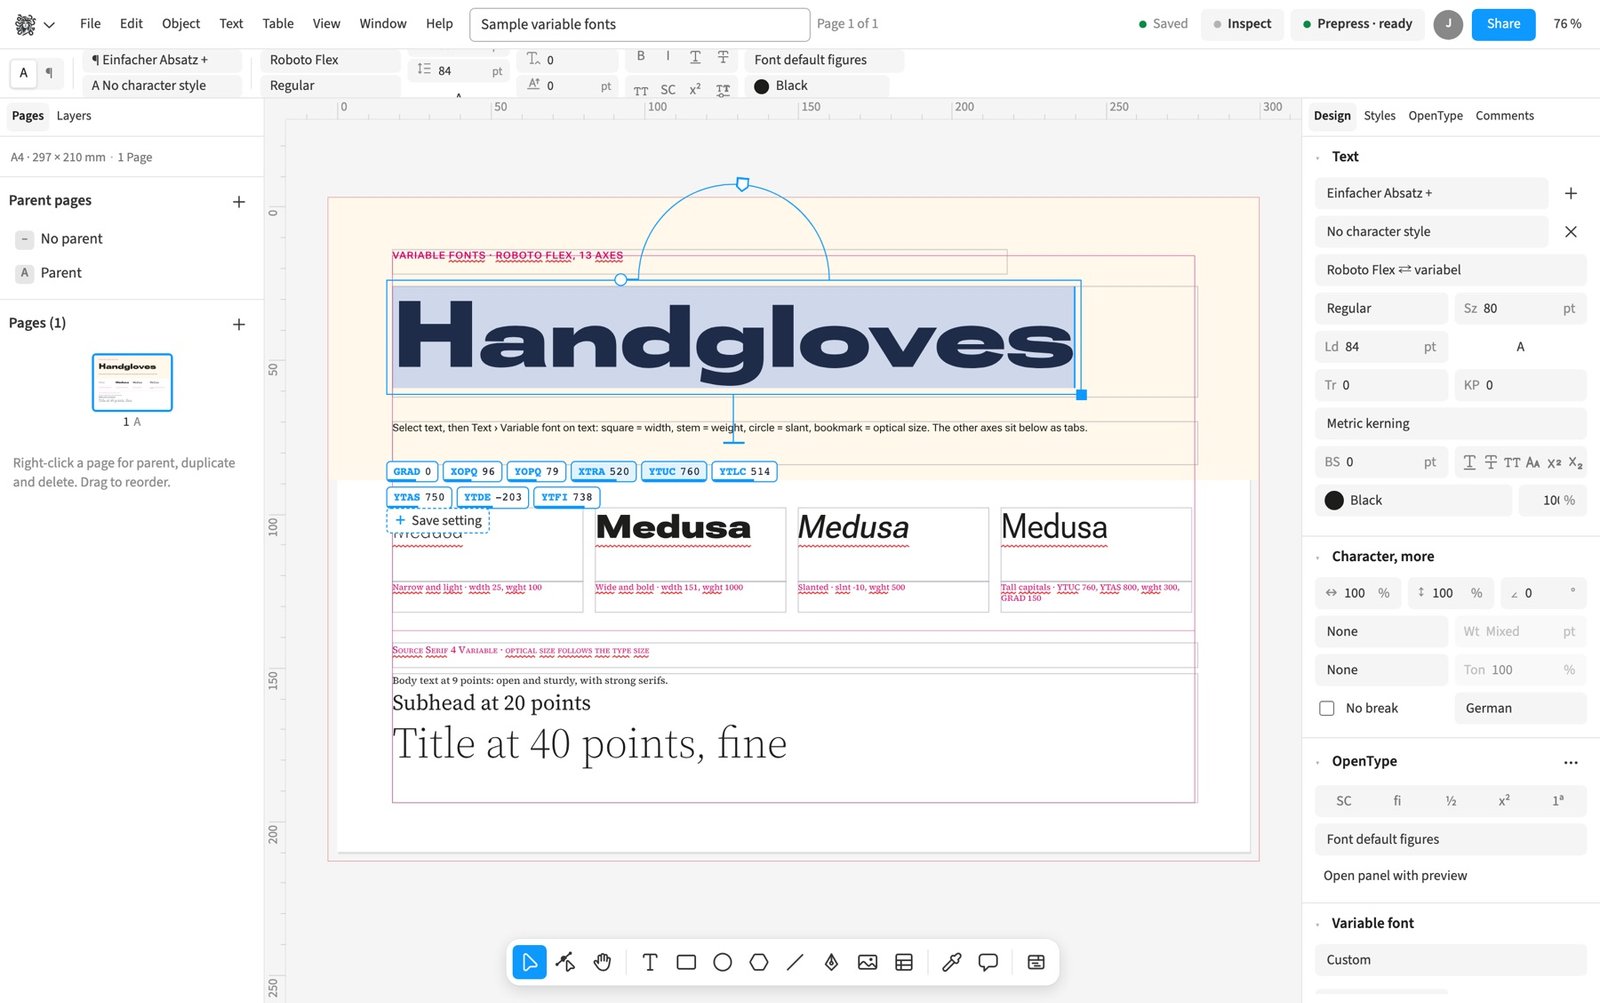
Variable fonts on the text. Square for width, stem for weight, circle for slant, bookmark for optical size; the other axes as tabs below.
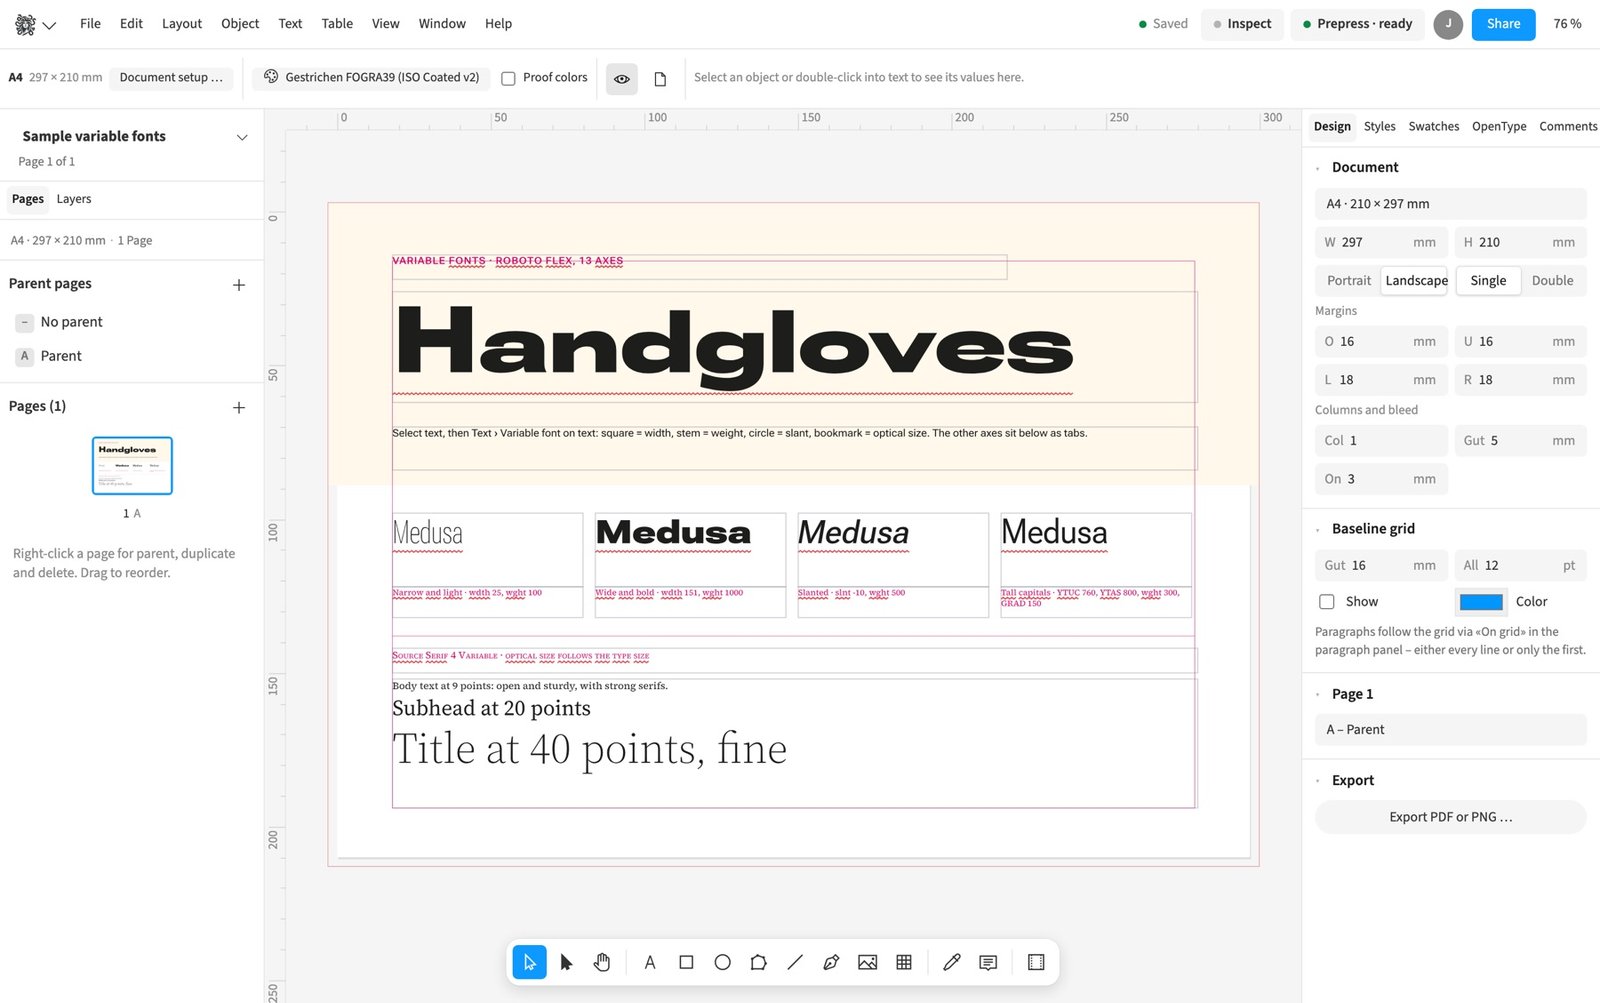
Variable fonts example
Variable fonts example. Roboto Flex with 13 axes and Source Serif 4 with optical size.

Around 1800 Google Fonts

browse, preview and add to the document in one click, as TTF, so they make it into the PDF

Where to find it Font › Fonts › Google Fonts …

You browse around 1800 Google Fonts families and inspect them in a font preview. The preview draws the selected font’s actual outlines. When designing a new magazine, you can compare families using your own sample text and install the chosen one in the document. Variable families come with their axes, while static families come as individual styles. Medusa retrieves the TTF version so the font is also available for embedding in the PDF.

How to do it

  1. Open Font › Fonts › Google Fonts …
  2. Search for the family and open its preview.
  3. Select the style or variable family and click Install.
Compared

Font service inside the app

Vendor sources, as of 25.9.2026 · Full comparison with all sources

Variable fonts on the text

handles for width, weight, slant and optical size, further axes as drag tabs, settings saved under a name

Where to find it Font › Variable font on text

Variable fonts carry several adjustable axes in a single font file. Medusa provides handles directly on the text for width, weight, slant and optical size where the font supplies those axes. Further axes appear as draggable tabs. For a magazine headline, you can adjust width while judging weight without searching for another style. You save useful settings under a name and can also store axis values in styles. Automatic optical size sets the corresponding axis according to the type size.

How to do it

  1. Select the text you want to edit.
  2. Apply a variable font to the text.
  3. Choose Font › Variable font on text.
  4. Drag the available axis handles and check the composition.

Tips

  • Save established axis values in a style when several headings should match.

Limits: Only axes contained in the selected font file are available.

Compared

Variable fonts

Vendor sources, as of 25.9.2026 · Full comparison with all sources

OpenType with preview

ligatures, figure styles, titling alternates, stylistic sets and character variants, showing what the font can do

Where to find it Font › Character

The OpenType controls show the features actually supplied by the current font. These include ligatures, figure styles, titling alternates, stylistic sets and character variants. In book production, you can choose tabular figures for numeric columns and other figure forms for body text. The preview helps you compare the available forms before deciding. You apply features to selected text and can keep them in character or paragraph styles. A font without a particular feature does not offer its variants.

How to do it

  1. Select the text you want to edit.
  2. Open Window › Text › Paragraph & Character.
  3. Open OpenType, compare the preview and select the required feature.

Upload your own TTF and OTF files; variable fonts arrive with all their axes and named instances

Where to find it Font › Fonts › Add font …

You upload your own TTF or OTF font files into the document. This lets you use an agency’s house typeface for brochures and advertisements. Variable font files bring their axes and named instances with them. After adding a font, you select it for the text and can use its supported OpenType features. The font files are also available to PDF export. Load the required styles before the final check so you review composition with the intended letterforms.

How to do it

  1. Choose Font › Fonts › Add font …
  2. Select the required TTF or OTF files.
  3. Select the text and apply the loaded family and appropriate style.

Lean PDFs

fonts embedded as subsets, OTF as CFF, text stays searchable

PDF export embeds the fonts used as subsets. The file carries the required glyphs rather than including the entire font file for unused characters. In a long book with several typefaces, this reduces the font portion of the output. OTF fonts with PostScript outlines are included as CFF in the PDF. Text stays searchable and is output using the chosen letterforms. You do not need to convert the type to outlines for this.

Bundled fonts with a free licence

nothing is loaded from outside servers

Where to find it Help › Licences and third-party works …

Medusa includes fonts under free licences. These bundled files are available without fetching them from external font servers. For an initial book draft, you can set text and check composition before adding your own house fonts. The editor and PDF use the same font files so character positions match. You can read the included licence texts under Help. The statement about external loading concerns bundled fonts, while Google Fonts provides a separate selection for adding fonts.

Arabic and Hebrew right to left, mixed with Latin text; cursor and selection in the right order, searchable in the PDF

Medusa sets Arabic and Hebrew from right to left and mixes them with Latin passages. Text direction takes account of logical character order and the display of each segment. On a multilingual book page, you can combine an Arabic paragraph with Latin names or numbers. Cursor placement and selection account for writing direction, while arrow keys move through logical text order. Text remains searchable in the PDF. Use a font containing the required characters and check mixed paragraphs before output.

How to do it

  1. Select the text frame.
  2. Apply a font with the required Arabic or Hebrew characters.
  3. Enter the text and check mixed names, numbers and punctuation in the layout.

Limits: Arabic and Hebrew have no spell check, and some mixed-text cases such as Lam-Alif across style boundaries remain limited.

Compared

Arabic and Hebrew (right to left)

Vendor sources, as of 25.9.2026 · Full comparison with all sources

Indic scripts such as Devanagari, Bengali and Tamil with correct conjuncts and vowel signs, searchable in the PDF

For Indic scripts, Medusa shapes character sequences into conjuncts and positions the associated vowel signs. This includes Devanagari, Bengali and Tamil with a suitable font. In a multilingual publishing brochure, you can edit these passages as text instead of placing finished images. PDF export draws the shaped characters and retains the underlying text for searching. Before print approval, check the actual font and difficult character combinations. Documented comparisons show good results for several scripts but also identify specific shaping limits.

How to do it

  1. Select the text frame.
  2. Choose a font for the required script.
  3. Insert the text and check conjuncts and vowel signs in the layout and PDF.

Limits: Known limits affect the Devanagari combination र्कि, Reph placement in morx fonts and Myanmar shaping.

Language detected automatically

hyphenation in 25 languages, spell checking in five (German with Swiss ss), hyphenation exceptions per language

Where to find it Font › Paragraph

Medusa detects language from the text and uses it for hyphenation and spelling. You can explicitly set the language for the whole text, a paragraph or individual characters. In a multilingual magazine, this helps with quotations and foreign-language passages inside an article. Hyphenation patterns cover 25 languages, with dictionaries for German using Swiss ss, English, French, Italian and Spanish. You store hyphenation exceptions per language in the document and specify permitted breaks yourself. An explicitly set paragraph language takes precedence even within text in another language.

How to do it

  1. Select the text you want to edit.
  2. Open Window › Text › Paragraph & Character.
  3. Choose the required language under Language.
  4. For custom break points, open Edit › Spelling › Hyphenation exceptions …

Tips

  • A word with no marked break in hyphenation exceptions is never hyphenated.

Language versions in the same document

each language on a layer of its own, each person switches to their version themselves. Running heads, indexes and hyphenation follow the language; changed source text marks a version “outdated”, only the changed paragraphs go out as XLIFF to the translation agency and come back with all character formatting

Where to find it File › More formats › Language versions …

You keep language versions on separate layers in the same document. Each person chooses their visible version independently of others. For a trilingual publisher’s brochure, target frames follow source frame positions and sizes while language and hyphenation match the version. Source text changes mark the affected version as outdated. XLIFF 2.1 lets you send only changed paragraphs with character formatting to a translation agency and import the translation again. For output, you can create one PDF per version or one PDF with switchable language layers.

How to do it

  1. Open File › More formats › Language versions …
  2. Create a version for the required target language.
  3. Choose File › More formats › Export texts as XLIFF …
  4. Import the translated file through Import translation from XLIFF …
  5. Switch to the required version under View › Language version.

Limits: The titles “Index” and “Contents” remain in the source language, and endnotes transfer only through XLIFF.

Compared

Language versions in one document, XLIFF

  • Medusa availableeach language on its own layer, text frames follow the source; changed source text flags a version as out of date; only the changed paragraphs go out as XLIFF and come back with character formatting; one PDF per version or all languages as layers
  • Adobe InDesign no reliable statement
  • QuarkXPress no reliable statement
  • Affinity Studio no reliable statement

Vendor sources, as of 25.9.2026 · Full comparison with all sources

Spell check across the whole document

replace, ignore or add to the document's shared dictionary

Where to find it Edit › Spelling › Spelling in the document …

The spell checker takes you through findings across the whole document. You replace a word, ignore a finding or add a term to the shared document dictionary. For a technical book, this records recurring product names and specialist terms for everyone working on it. Checking uses the language of the text and offers suitable suggestions from the available dictionaries. Dictionary entries belong to the document so the next person does not need to handle the same terms again. Check each suggestion in context before applying it.

How to do it

  1. Choose Edit › Spelling › Spelling in the document …
  2. Review the marked word and suggested replacement.
  3. Replace it, ignore the finding or use Add to dictionary.
Compared

Spell checking

Vendor sources, as of 25.9.2026 · Full comparison with all sources

Grammar and style with LanguageTool

paragraph by paragraph in its own language, suggestions on right-click, with your own account

Where to find it Edit › Spelling › Check grammar …

LanguageTool checks grammar and style paragraph by paragraph in each paragraph’s language. You choose whether to check the selection, story or whole document. For a magazine article, this lets you review phrasing and grammar after checking spelling. Findings appear in the text and offer replacement suggestions on right-click. In preferences, you can add your own LanguageTool account and switch checking on or off. Before the first submission, Medusa explains that the service receives the text for checking.

How to do it

  1. Open Settings …
  2. Configure checking under Grammar.
  3. Choose Edit › Spelling › Check grammar …
  4. Choose the scope and review suggestions by right-clicking a finding.

Limits: Very long paragraphs are checked only at the beginning, and languages unsupported by LanguageTool remain unchecked.

Compared

Grammar and style checking

Vendor sources, as of 25.9.2026 · Full comparison with all sources

Punctuation spacing by language

a thin space before ; ! ? in French, separate rules for Switzerland and Canada; the text stays as typed

Where to find it File › Document setup … › Typography

Punctuation spacing follows the language of the paragraph or individual characters. For French, composition inserts narrow no-break spaces before semicolons, exclamation marks and question marks, and no-break word spaces before colons and inside guillemets. Swiss French uses narrow spaces throughout, while Canadian French uses no space before semicolons, exclamation marks or question marks. For a multilingual brochure, you can set these rules in the document without rewriting every passage manually. Stored text stays unchanged, so searching and copying still use the typed character sequence. Spacing is applied during composition and appears in output too.

How to do it

  1. Open File › Document setup …
  2. Choose Typography.
  3. Enable Punctuation spacing by language and check the rules for each language.
  4. Assign the appropriate language to the paragraphs and check composition.

Quotation marks to match the language as you type; clean up text by Swiss federal, Duden and French typographic rules, with colour highlighting

Where to find it Edit › Clean up text …

Typographic quotation marks follow the text’s language as you type. For existing text, cleanup offers Swiss federal, Duden and French typographic rules. In an imported book manuscript, you can standardise quotation marks, apostrophes, dashes and no-break spaces according to a chosen rule. The dialog lets you specify the scope and corrections required. Colour highlighting makes changed passages visible for review. Remove that highlighting after checking and before producing the final output.

How to do it

  1. Select the text you want to edit.
  2. Open Edit › Clean up text …
  3. Choose Language, Scope and the required corrections and enable Highlight changes in colour.
  4. Click Clean up.
  5. Review the changes, then click Remove highlighting.

Tips

  • The highlight colour is a text change and must be removed before output.

Long documents & books

From annual report to book: Medusa keeps contents, notes and references up to date.

A book from several documents

continuous page numbers, styles aligned across all parts, one PDF for the whole or one per part, one check over everything

Where to find it Window › Book

You manage several documents as parts of a book and continue page numbering across them. For an annual report, editorial and design teams can work on separate chapters and output them together. You align styles across the parts and run preflight for the entire book. At output, you choose a single PDF or one PDF per part and use an output workflow.

How to do it

  1. Open «Window» › «Book» and choose «Create book».
  2. Add the chapter documents with «Add …».
  3. Choose «Update book» and check page order.
  4. Use «Check» before «Output …».

Tips

  • Update the book before running the combined preflight and output.
Compared

Books, TOC, index, cross-references

Vendor sources, as of 25.9.2026 · Full comparison with all sources

A manuscript in one go

several Word, Markdown or text files as chapters with autoflow; one style mapping for all, footnotes, images, chapters on a right-hand page

Where to find it File › Assemble › Assemble manuscript …

You assemble several Word, Markdown or text files in a chapter list and set their order. For a reference book, you map paragraph styles once and use that mapping for all chapters. Autoflow creates the required frames and pages and brings in images and footnotes from readable source files. You can start each chapter on a right-hand page and choose parent pages for chapter openers and blank pages.

How to do it

  1. Choose «File» › «Assemble» › «Assemble manuscript …».
  2. Load the chapter files under «Files (Word, Markdown, text)» and arrange them.
  3. Under «Each chapter starts», choose «On a right-hand page».
  4. Choose «Set».
  5. Then check and confirm the shared style mapping for all chapters.

Tips

  • Use ⌥↑ and ⌥↓ to change chapter order in the list.

Smart text reflow

whoever types past the end of the last frame gets new pages and frames; switched on and off in the “Layout” menu

Where to find it Layout › Smart text reflow

Smart text reflow adds pages and text frames when you type beyond the end of the last frame in a thread. A long magazine article can therefore continue into additional frames. You switch this behaviour on or off in the Layout menu. After a substantial addition, check the new pages and line breaks before outputting the document.

How to do it

  1. Enable «Layout» › «Smart text reflow».
  2. Continue typing in the last threaded text frame.
  3. Check the added pages and frames.

Contribution inbox

send members a link, they submit text (Word files too) and up to five images with caption and creator without an account. The contributions sit in a list and go into the document as a manuscript with one click

Where to find it File › Assemble › Contribution inbox …

You create a contribution link through which members submit text and images without an account. For a club magazine, this collects reports as text or Word files and up to five images per contribution with captions and creator details. Submissions appear in the contribution inbox and can be imported as a manuscript. Medusa places the text in the document and adds the submitted images and accompanying text to the text flow.

How to do it

  1. Choose «File» › «Assemble» › «Contribution inbox …».
  2. Create a link with «Create contribution link» and share it with contributors.
  3. Open a submission and check its text and images.
  4. Choose «Apply» to place it as a manuscript.
Compared

Contribution inbox, no account

  • Medusa availablelink for members: text (Word files too) and up to five images with caption and creator; one click places the contribution in the document as a manuscript
  • Adobe InDesign no reliable statement
  • QuarkXPress no reliable statement
  • Affinity Studio no reliable statement

Vendor sources, as of 25.9.2026 · Full comparison with all sources

Table of contents with TOC styles

levels, page number before or after, leaders, alphabetical sorting, clickable and bookmarked in the PDF, across the whole book too

Where to find it Layout › Indexes and contents › Table of contents …

You generate a table of contents from paragraph styles and assign heading levels. In a book, chapter headings can use a different entry style from subheadings. A named TOC style stores the rules for entry styles, page numbers, leaders and alphabetical sorting. You can make entries hyperlinks and output PDF bookmarks, including contents for the whole book.

How to do it

  1. Apply paragraph styles to headings.
  2. Open «Layout» › «Indexes and contents» › «Table of contents …».
  3. Assign paragraph styles to levels and set page numbers and leaders.
  4. After pagination changes, run «Update tables».
Compared

Books, TOC, index, cross-references

Vendor sources, as of 25.9.2026 · Full comparison with all sources

Footnotes and endnotes with numbering style, start number, restart per page or section and their own divider, typed in the note area, with italics, small caps, links and cross-references

Where to find it Font › Footnotes and endnotes › Insert footnote (⌘⌥F)

You add a footnote or endnote to a text position and set the numbering style, starting number and restart rule. In a specialist book, this keeps sources and explanations attached to the text. You edit laid-out footnotes directly in the note area and can use italics, small caps, hyperlinks and cross-references there. Options also control the divider and spacing, and formatting carries through to PDF and EPUB.

How to do it

  1. Place the text cursor at the reference position.
  2. Choose «Font» › «Footnotes and endnotes» › «Insert footnote».
  3. Type the explanation in the note area.
  4. Set numbering and the divider in «Footnote options …».

Tips

  • Use ⌘⌥F to insert a footnote; Esc returns from the laid-out note to the text.

Limits: Formatting in Word footnotes is not retained on import.

Compared

Footnotes and endnotes

Vendor sources, as of 25.9.2026 · Full comparison with all sources

Cross-references, an index with several registers (for people and places, say, page ranges collapsed, sorting by document language), marginalia and captions that follow the image; anchored objects flow with the text

Where to find it Layout › Indexes and contents › Index entry … (⌘⇧⌥I)

You insert cross-references and index marks into text and attach related objects to the appropriate paragraph with anchors. For a reference book, you can maintain separate indexes for people and places, with collapsed page ranges and sorting by document language. Marginal notes sit beside the text, and captions follow their images. Anchored objects move with text edits, and you can update indexes after pagination changes.

How to do it

  1. Select a term in the text.
  2. Choose «Layout» › «Indexes and contents» › «Index entry …» and select the «Index».
  3. Generate the list with «Index …».
  4. After pagination changes, use «Update tables».
Compared

Books, TOC, index, cross-references

Vendor sources, as of 25.9.2026 · Full comparison with all sources

Image credits

creator and rights come from the image files, appear as a field on the image and can be set and updated as a collected list in the document

Where to find it Layout › Indexes and contents › Image credits

Medusa reads creator and rights information from image metadata and provides the credit on the image frame. For a magazine, you can collect credits for the photographs used, with page numbers, in one list. Hidden images do not count, while images in groups, shapes and the text flow do. You place the collected list in the document and update it after replacing images or changing pagination.

How to do it

  1. Check the «Image credit» field on the image frame.
  2. Choose «Layout» › «Indexes and contents» › «Image credits».
  3. After changes, use «Update tables».
Compared

Books, TOC, index, cross-references

Vendor sources, as of 25.9.2026 · Full comparison with all sources

Parent pages nested (“based on”) and linked from other documents, several per page in stacking order; hide single master items per page, so there is no logo on the chapter opener

Where to find it Layout › Parent pages

You base parent pages on one another and can link parents from another document. For a magazine, you can combine a basic grid, section heading and folio as several parents on the same page. The order of assigned parents determines stacking order, and individual parent items can be hidden per page. A linked parent is stored as a copy in the document, so PDF output and packaging do not require the source.

How to do it

  1. Open «Layout» › «Parent pages».
  2. Choose «Link parent page from another document …» for an external parent.
  3. Assign the required parents in the pages panel.
  4. Hide exceptions under «Master objects on this page».

Tips

  • Hold ⌥ to add another parent page.
Compared

Parent pages, baseline grid

  • Medusa availableparents nested too, and linked from another document; several per page in stacking order
  • Adobe InDesign available
  • QuarkXPress available
  • Affinity Studio available

Vendor sources, as of 25.9.2026 · Full comparison with all sources

Sections with their own numbering, Roman too, running heads; chapter openers without running heads, blank pages stay empty

Where to find it Layout › Numbering and section …

You start sections with their own page numbering and can use Roman numerals. In a book, this gives the front matter different numbering from the main text. Running heads take their content from the text and accompany pages with the relevant heading. When assembling a manuscript, you decide whether chapter openers omit running heads and folios and blank pages stay empty.

How to do it

  1. Select the first page of the new section.
  2. Open «Layout» › «Numbering and section …».
  3. Set the numbering style and start number.
  4. Insert the running head on the parent page through «Font» › «Text variables».

Text variables

your own as text or as a date with a pattern, plus file name, output date, chapter number and character and word counts; “Continued on page …” follows the text thread

Where to find it Font › Text variables › Text variables …

You insert recurring information as text variables and maintain the value in one place. For a magazine, you can use a custom text variable for the issue name and a date pattern for the output date. File name, chapter number, character and word counts provide further information, and continuation references follow the frame thread. Changing a custom variable updates every occurrence, while deleting the variable leaves its previous text in place.

How to do it

  1. Place the cursor at the required text position.
  2. Open «Font» › «Text variables» › «Text variables …».
  3. Create a text or date variable and insert it.

Limits: Character and word counts exclude hidden conditional text, footnotes, field contents and soft hyphens.

Compared

Text variables, running heads

Vendor sources, as of 25.9.2026 · Full comparison with all sources

Tables & calculations

Calculate as in a spreadsheet, typeset like a professional.

Tables that calculate
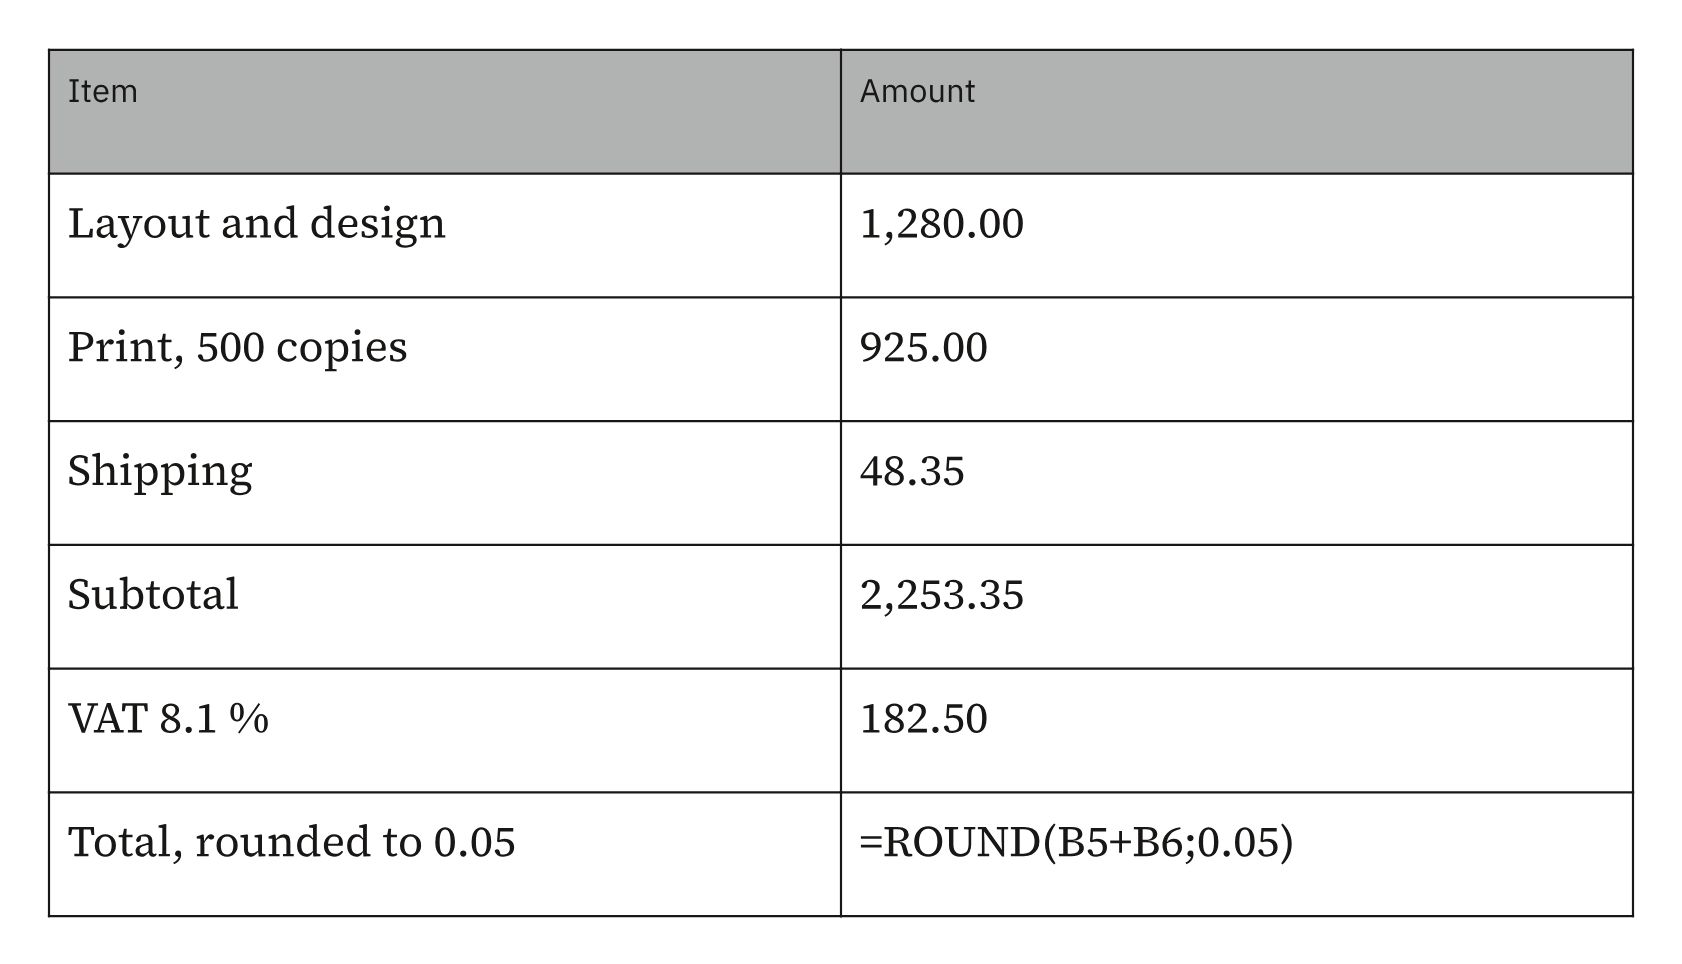
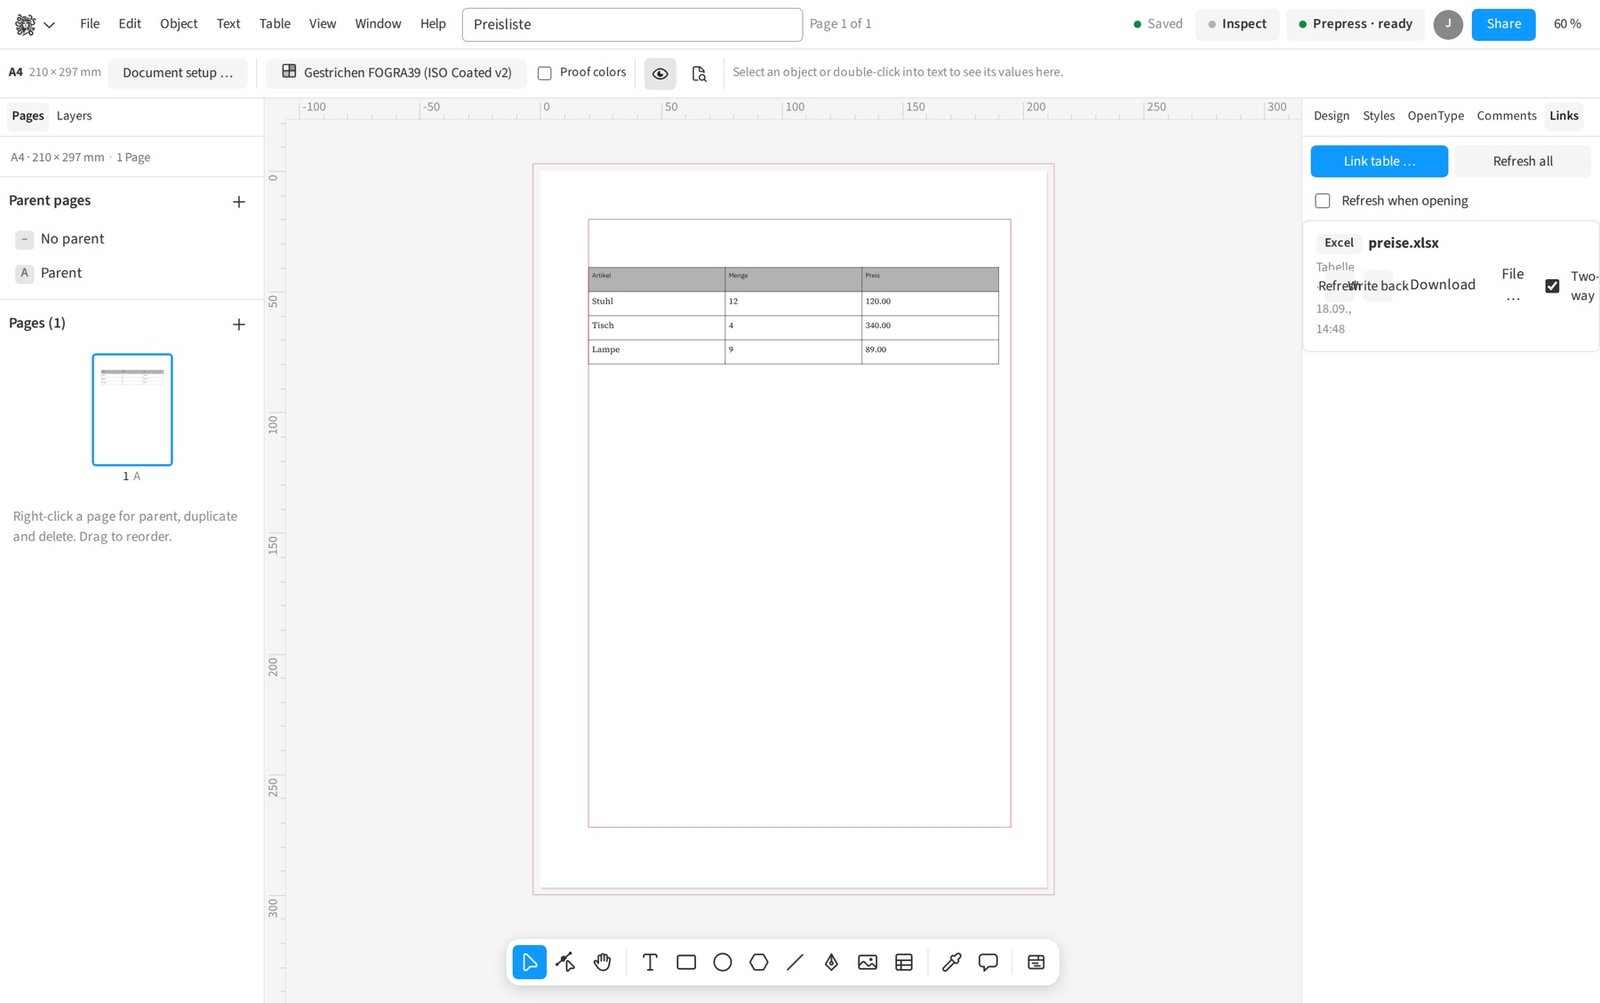
Tables that calculate. A quote with SUM and ROUND to 0.05, the total as a calculated field in the text.

Tables that calculate

cells starting with “=” know SUM, ROUND to 0.05, IF, ranges, references to other tables and document values such as VAT

Where to find it Table › Calculate › Enter formula

Start a table cell with “=” to calculate a result from values, cell references or ranges. For a print shop estimate, you can sum items, use conditions and round to increments of 0.05. Formulas can include other named tables and document values such as a VAT rate. Errors appear as error values in the cell, and the small blue formula indicator on screen does not print.

How to do it

  1. Click the result cell.
  2. Choose «Table» › «Calculate» › «Enter formula» or type “=”.
  3. Enter the formula with cell references and confirm with Enter.
  4. Check the result and adjust «Number format …» if needed.

Limits: VLOOKUP, whole-column references such as A:A and wildcards in SUMIF are outside the supported formula set.

Compared

Calculations in tables

  • Medusa availableformulas in cells, fill down, references to other tables, calculated field in text, sorting
  • Adobe InDesign no reliable statement
  • QuarkXPress no reliable statement
  • Affinity Studio no reliable statement

Vendor sources, as of 25.9.2026 · Full comparison with all sources

The total in the running text

a calculated field brings any result into the text and keeps it current

Where to find it Font › Text variables › Calculated field …

A calculated field inserts the result of a cell, document value or formula directly into your text. For an agency proposal, you can repeat the calculated total in the closing sentence. Medusa updates that position when the underlying value changes. You set decimal places and text before or after the number to fit the result into the sentence.

How to do it

  1. Place the cursor in the running text.
  2. Open «Font» › «Text variables» › «Calculated field …».
  3. Enter the source under «Cell, document value or formula».
  4. Set «Decimal places» and insert the field.

Tips

  • Name the source table before inserting the calculated field to keep the reference readable.
Compared

Calculations in tables

  • Medusa availableformulas in cells, fill down, references to other tables, calculated field in text, sorting
  • Adobe InDesign no reliable statement
  • QuarkXPress no reliable statement
  • Affinity Studio no reliable statement

Vendor sources, as of 25.9.2026 · Full comparison with all sources

Calculate the way you are used to

fill a formula down, name tables, sort by column; inserting columns updates references everywhere

Where to find it Table › Calculate › Fill formula down

You fill formulas down and let relative cell references move with each row. In a long print shop estimate, each item then uses the same calculation rule with its own values. Named tables make references easier to read, and renaming tables or inserting columns updates references in calculated fields and document values too. Sorting by column orders the table body by text or numbers.

How to do it

  1. Select the top formula cell and the target cells below.
  2. Choose «Table» › «Calculate» › «Fill formula down».
  3. Check relative references and references fixed with “$”.

Tips

  • Use “$” for references that should stay fixed when filling.
Compared

Calculations in tables

  • Medusa availableformulas in cells, fill down, references to other tables, calculated field in text, sorting
  • Adobe InDesign no reliable statement
  • QuarkXPress no reliable statement
  • Affinity Studio no reliable statement

Vendor sources, as of 25.9.2026 · Full comparison with all sources

Numbers set cleanly

thousands separator as apostrophe, thin space, full stop or comma, percent format, “12.–” for round amounts, alignment on the decimal mark, a true minus sign; charts and data fields follow

Where to find it Table › Calculate › Number format …

You set the document's number grouping and format calculated table values with suitable decimal places. In an annual report, you can consistently typeset percentages, round amounts and negative numbers. The thousands separator can be an apostrophe, thin space, full stop or comma, and decimal alignment lines up numbers on a point or comma. Charts and data fields also use number settings, while percentage formatting multiplies the value by one hundred for display.

How to do it

  1. Select the cells to format.
  2. Open «Table» › «Calculate» › «Number format …».
  3. Set «Decimal places» and «Align on decimal separator».
  4. Confirm with «Apply».

Tips

  • You can disable thousands grouping for years and item numbers.

Tables over many pages

merged cells, header and footer rows, alternating fills, strokes per cell edge, cell text rotated 90°, 180° or 270°, breaking across frames and pages, even through a row that may split at the end of a frame

Where to find it Table

You design tables with merged cells, header and footer rows, alternating fills and strokes for individual cell edges. A long product overview in a catalogue can flow through threaded frames across several pages. For narrow columns, you can rotate cell text by 90°, 180° or 270°. A row allowed to split can break at the end of a frame so a long text cell continues on the next page.

How to do it

  1. Create a table in text through «Table» › «Insert table …».
  2. Thread the text frames for subsequent pages.
  3. Set header and footer rows and cell appearance.
  4. Check «Table» › «Breaks» for table continuation.
Compared

Tables across frames and pages

Rotate text in table cells

  • Medusa available90°, 180° and 270° per cell; the same on screen, in PNG, PDF and SVG
  • Adobe InDesign availablerotation in the cell options↗ Adobe: Format text in tables
  • QuarkXPress no reliable statement
  • Affinity Studio no reliable statement

Vendor sources, as of 25.9.2026 · Full comparison with all sources

Table and cell styles as named styles

design once, identical everywhere

Where to find it Window › Styles › Table styles

You save formatting as a named table or cell style and apply it repeatedly. In a magazine, this gives comparison tables the same basic appearance. Table styles collect rules for the table, while cell styles cover the appearance of individual cells. Styles belong to the document and can be loaded from another document alongside other style types.

How to do it

  1. Select a table or cells as a starting point.
  2. Open «Window» › «Styles» and the «Table styles» or «Cell styles» section.
  3. Use «New table style from the table» or «New cell style from the cell» and name the style.
  4. Apply the style to other tables or cells.

Charts, codes & graphics

Charts, codes and drawings are objects in the layout and vectors in the PDF, with no add-on.

Charts
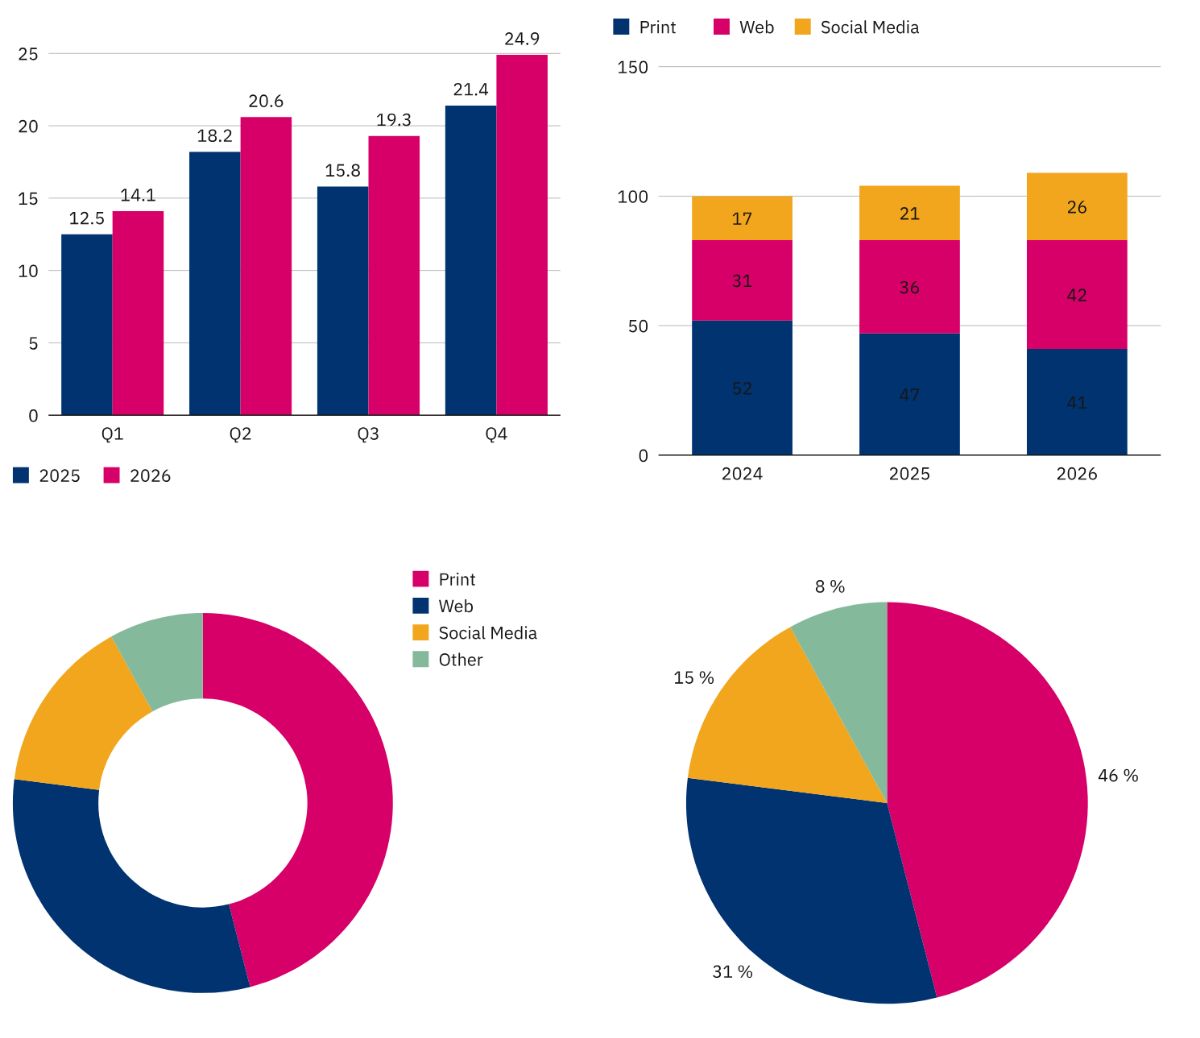
Charts. Grouped and stacked columns, doughnut and pie, editable objects in the document colours.
Barcodes and 2D codes
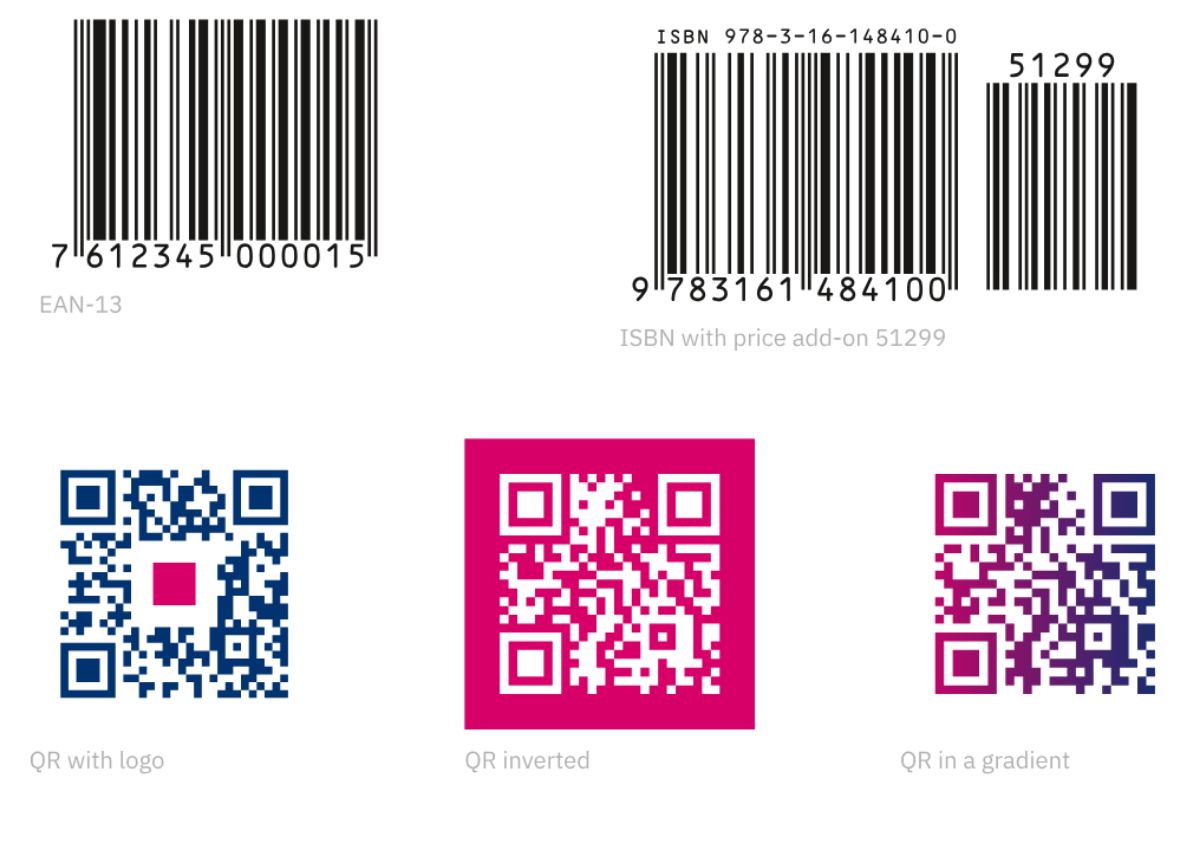
Barcodes and 2D codes. EAN, ISBN, UPC, Code 128, GS1-128, QR with logo, DataMatrix and PDF417 as vectors.
Org chart and flow
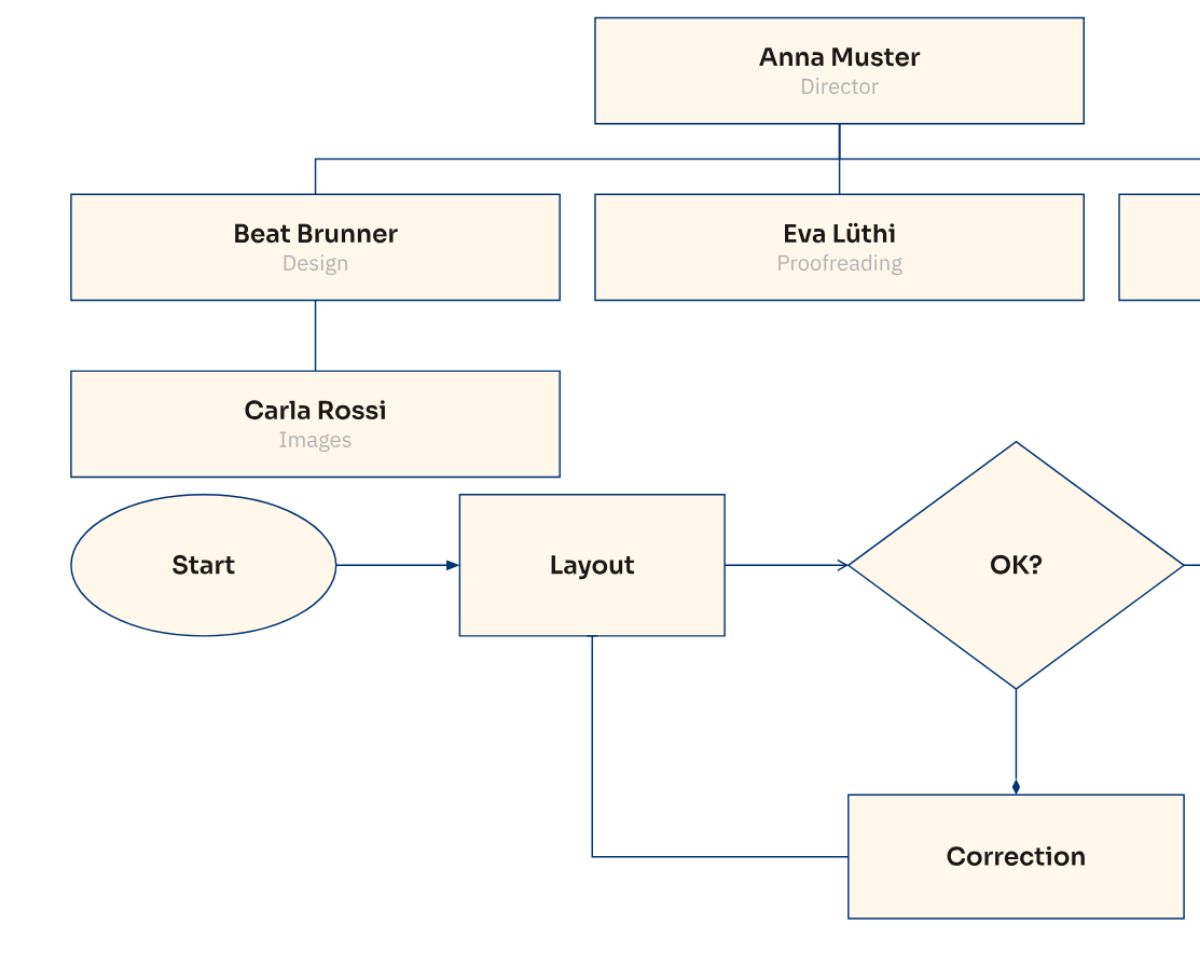
Org chart and flow. An org chart from a list, a flow with connectors that follow.

Charts from numbers

columns, bars, lines, area, pie, doughnut and pictogram, stacked and 100 %, as vectors in the document's colours

Where to find it Object › Place › Chart …

You generate column, bar, line, area, pie, doughnut or pictogram charts from numbers. In an annual report, you can also compare series stacked or as shares of 100 %. Charts use document swatches and remain editable as charts. They appear as vectors in the PDF, keeping lines and fills sharp when enlarged.

How to do it

  1. Open «Object» › «Place» › «Chart …».
  2. Choose the «Kind» and enter categories and numbers.
  3. Choose colours and labels and insert the chart.

Limits: Pie and doughnut charts show only the first data series.

Enter data as in Excel

Tab, Enter, insert rows and columns, paste ranges from Excel or Google Sheets, for charts, org charts and node diagrams

Where to find it Object › Place › Chart …

You enter chart data in a grid with rows and columns. For a magazine graphic, you can copy a range from Excel or Google Sheets and paste it into the grid. Tab and Enter move through the input, and a new row appears at the end. The same grid also serves org charts and node diagrams, with columns for their respective data.

How to do it

  1. Open «Object» › «Place» › «Chart …».
  2. Click the first target cell and paste the copied range.
  3. Add values with Tab and Enter and check the preview.

Tips

  • In a selected data range, ⌘D fills down and ⌘↩ fills the range with one value.

Charts with pictures

an image per category above the bar, at its foot, on the axis or as a pictogram; it follows every change

Where to find it Object › Place › Chart …

You assign an image to each chart category. For a catalogue product comparison, the product photograph can sit above the bar, at its foot or on the axis. As a pictogram, the image can also represent the value. The assignment follows the category and stays with it when the chart changes.

How to do it

  1. Open a chart for editing.
  2. Add the image column through «Image» and enter a file name for each category.
  3. Assign the images and choose their position in the chart.

Charts in detail

values as number, percent or both, names on the segment, colours tied to the series name, resizing recalculates

Where to find it Window › Chart

You show values, percentages or both in pie, doughnut and 100 % charts and can place names directly on segments. In an annual report, this reduces the need to consult a separate legend. Series keep their colours by name when data is reordered. Resizing recalculates the chart while preserving font sizes and line weights, and Medusa reports labels that no longer fit.

How to do it

  1. Select the chart and open «Window» › «Chart».
  2. Set the value display and label position.
  3. Resize the graphic and check any label warnings.

Limits: Labels that do not fit can cause overset, which Medusa reports.

Org charts and flows

org charts from a list or table, flowcharts with “yes” and “no” on the arrows, node diagrams with named inputs and outputs

Where to find it Object › Place › Org Chart …

You create an org chart from a list or table and show hierarchies as connected boxes. In an agency handbook, you can use this to show responsibilities. Flowcharts provide labelled arrows for decisions, while node diagrams connect named inputs and outputs. You can move boxes manually after creation, and connectors follow.

How to do it

  1. Choose «Object» › «Place» › «Org Chart …» or «Node Diagram …».
  2. Enter the hierarchy or named connections in the grid.
  3. Insert the diagram and adjust its boxes in the layout.

Connectors that follow

straight, right-angled, rounded or curved, with labels; move the shapes and the lines come along

Where to find it Object › Paths › Connect

You connect shapes with straight, right-angled, rounded or curved lines. For a print shop production workflow, relationships stay attached when you rearrange boxes. Connectors follow shapes and can carry a label whose box grows with its text. With the connector tool, you can drag an endpoint onto another shape.

How to do it

  1. Select two shapes.
  2. Use «Object» › «Paths» › «Connect».
  3. Set routing under «Connector Style».
  4. Add a label with «Label Connector …» if needed.

Diagrams by hand

drag boxes with the mouse or arrow keys, connectors follow automatically; «+» on a box or connector adds a new point; connection points round or square, a box's shape can be changed; set line style, weight, colour, dash, arrows and fill for every box or connector in a diagram at once

Where to find it Window › Chart

You move diagram boxes with the mouse or arrow keys while keeping their connections. In an agency handbook flowchart, this lets you make room for explanations later. A plus sign on a box or connector adds a box, and connection-point and box shapes can be changed. You can select all boxes or all connectors in a diagram together and format their lines, arrows and fills in one operation.

How to do it

  1. Select a box and move it with the mouse or arrow keys.
  2. Add another box with “+”.
  3. Use «Select all connectors of the diagram» or «Select all boxes of the diagram» in the diagram context menu.
  4. Set stroke and fill for the selection.

Tips

  • Tab adds another box to a selected diagram box; ↩ adds one alongside.

QR-bill

payment slip and receipt to the Swiss guidelines at the foot of the page, reference from a member number or verified, one invoice per member with data merge; IBAN, reference and names searchable in the PDF

Where to find it Object › Place › QR-bill …

You insert the payment section and receipt of a Swiss QR bill at the foot of the page. For a club membership invoice, addresses, amount and reference can come from data merge. Medusa generates the reference from a membership number or validates an existing reference and reports invalid entries before output. IBAN, reference and names remain searchable text in the PDF.

How to do it

  1. Open «Object» › «Place» › «QR-bill …».
  2. Enter account, addresses and amount or use data fields.
  3. Choose the reference type and check reported errors.
  4. Insert the bill and check the foot of the page.

Tips

  • Run preflight after moving, scaling or recolouring a QR bill.
Compared

QR-bill (Swiss payment slip)

  • Medusa availablepayment slip and receipt to the Swiss standard, reference from a member number or verified, per record via data merge
  • Adobe InDesign no reliable statement
  • QuarkXPress no reliable statement
  • Affinity Studio no reliable statement

Vendor sources, as of 25.9.2026 · Full comparison with all sources

Barcodes as vectors

EAN-13, ISBN with price add-on, ISMN, ISSN, EAN-8, UPC-A, Code 128 and GS1-128 with OCR-B text and bar width reduction; Pharmacode and Braille for packaging

Where to find it Object › Place › Barcode or QR code …

You place EAN-13, EAN-8, UPC-A, Code 128, GS1-128, ISBN, ISMN and ISSN as vector codes. For a book cover, you can include an add-on with the ISBN code. Human-readable text for the supported codes uses OCR-B, and bar width reduction compensates for print gain. Pharmacode and Braille add packaging options, and codes remain vectors in the PDF.

How to do it

  1. Open «Object» › «Place» › «Barcode or QR code …».
  2. Choose the «Kind» and enter the «Contents».
  3. Set «Size (%)» and, if needed, «Bar width reduction (mm)».
  4. Check the preview and insert the code.
Compared

Barcodes and 2D codes

Vendor sources, as of 25.9.2026 · Full comparison with all sources

2D codes in any colour

QR with a logo in the middle, inverted or in a gradient, DataMatrix, GS1 DataMatrix and PDF417, per record too

Where to find it Object › Place › Barcode or QR code …

You generate QR, DataMatrix, GS1 DataMatrix and PDF417 as vector objects using document colours. For an agency flyer, a QR code can reserve space for a central logo or appear light on a dark background. QR also supports gradients, with warnings for colours that are too light and limited reader compatibility. In data merge, each record receives its own code from the assigned field.

How to do it

  1. Open «Object» › «Place» › «Barcode or QR code …».
  2. Choose the «Kind» and enter the «Contents».
  3. Adjust the appearance under «Color» and review warnings.
  4. Insert the code and test a printout with the intended reader.

Tips

  • Test the printed code with the intended devices, especially with a logo, gradient or inversion.

Limits: Not every reader can read inverted QR codes.

Compared

Barcodes and 2D codes

Vendor sources, as of 25.9.2026 · Full comparison with all sources

Calendars at the push of a button

a month per page or in a grid, week numbers, holidays from .ics or CSV, moon phases, and the same again for next year

Where to find it Object › Place › Calendar …

You generate calendars with one month per page or several months in a grid. For a print shop's annual calendar, you set the week start, week numbers and moon phases. You can import public holidays and vacations from .ics or CSV files and display them in day cells. For the following year, Medusa creates new pages with the same placement, styling and saved settings and reports incomplete holiday-file coverage.

How to do it

  1. Choose «Object» › «Place» › «Calendar …».
  2. Set «Year», «From month», «Number of months» and «Arrangement».
  3. Load the file under «Holidays and vacations» and enable «Moon phases» if needed.
  4. Create the calendar and check the day cells.
Compared

Calendars with holidays

  • Medusa availablemonths as tables, holidays and closures from .ics or CSV, moon phases with quarters, following year
  • Adobe InDesign no reliable statement
  • QuarkXPress no reliable statement
  • Affinity Studio no reliable statement

Vendor sources, as of 25.9.2026 · Full comparison with all sources

Drawing

pen and direct selection, pathfinder, polygons and stars, corner options per corner

Where to find it Object › Paths › Pathfinder

You draw custom paths with the pen and edit their points with direct selection. For an agency mark, you can use the pathfinder to unite, subtract or intersect basic shapes. Polygons and stars provide starting shapes that you can adjust further. Corner options allow different settings per corner, and shapes remain vectors in the PDF.

How to do it

  1. Draw basic shapes or a path with «Pen».
  2. Select several shapes and open «Object» › «Paths» › «Pathfinder».
  3. Use «Add», «Subtract» or «Intersect».
  4. Edit points with «Direct Selection».

Strokes dashed, dotted or dash-dot, with caps, joins and arrowheads, placed inside, centred or outside the shape, the same on screen, in the PDF and in SVG

Where to find it Window › Properties › Stroke

You style strokes as solid, dashed, dotted or dash-dot lines. For a magazine infographic, you set caps, joins and arrowheads to match their meaning. The stroke can sit inside, centred on or outside the shape. The screen, PDF and SVG use these settings for rendering and output.

How to do it

  1. Select a shape or line.
  2. Open «Stroke» in «Properties».
  3. Set weight, dash style, caps and alignment.
  4. Check the result at its final size.

Effects with their own window

drop and inner shadow, feathering per side, global light; groups carry opacity, blend mode and effects as a whole

Where to find it Object › Appearance › Effects …

You adjust shadows and feathering in a dedicated effects window. For a magazine image box, you can use a drop shadow, inner shadow or feathering per side. Global light coordinates the light direction of effects that use it, and groups carry opacity, blend mode and effects as a whole. In the print PDF, shadows and feathering retain their colours, including pure black and separate spot-colour plates.

How to do it

  1. Select the object or group.
  2. Open «Object» › «Appearance» › «Effects …».
  3. Enable the required effect and adjust its values.
  4. Check the effect on the intended background.

Limits: Outer or inner glow, bevel and emboss, and satin are outside the available effects.

Convert type to outlines, matching the typesetting exactly, for logos, lettering and fonts without embedding rights

Where to find it Font › Create outlines (⌘⇧⌥O)

You convert typeset text to outlines while preserving glyph positions, including descenders. For logo lettering, you can then edit the outlines as vector shapes. This also supports output for a font without embedding rights. Converted text can remain readable in an accessible PDF, but editing the paths invalidates the stored original text.

How to do it

  1. Select the text frame or the characters to convert.
  2. Choose «Font» › «Create outlines».
  3. Check the outlines and edit them with «Direct Selection» if needed.

Limits: Editing the paths invalidates the stored original text for accessible output.

Catalogues & data merge

Spreadsheet in, catalogue out. Next year you check only what changed.

Next edition
Next edition. The new price list is matched: changed, new, dropped, and a hand edit flagged as a conflict.

The next edition by matching

the new price list is matched by key, hand edits are flagged as conflicts, plus a proof PDF with only the changed pages

Where to find it Data › Update data …

You match a new data list to existing tiles, lists or table rows using a key field. For the next catalogue edition, you review changed values, new records and discontinued items before applying them. Manual edits appear as conflicts, where you can take the list value or keep the manual edit. A proof PDF contains only affected pages and can include correction notes for the changes.

How to do it

  1. Open «Data» › «Update data …» and load the new list.
  2. Select the «Key» and check the preview.
  3. Open «Data changes …» and resolve conflicts with «Take the list» or «Keep manual edit».
  4. Create «Correction PDF …» if needed.

Tips

  • Use a stable, unique item key for matching.
Compared

Catalogue from data, update for the next edition

Vendor sources, as of 25.9.2026 · Full comparison with all sources

Product tiles from data

one template, one tile per record, product groups with a header tile and a new page, a template per field value; 500 items in under a second

Where to find it Data › Distribute records …

You design a product tile as a template and distribute a filled copy for each record. For a catalogue, you can give product groups header tiles and separate page starts. A field value can determine which template an item uses, giving different product types different tiles. Redistributing replaces existing tiles after showing their count, and the template itself then stops printing. The documented test with 500 records, groups and one combined change in the same document took about 360 to 390 milliseconds on a Mac.

How to do it

  1. Load the product list with «Load data source …».
  2. Design and select the tile template with its data fields.
  3. Open «Data» › «Distribute records …».
  4. Set grouping and templates and check the distribution.

Catalogues in the text flow

a block of paragraphs per record with group headings, missing pages are added, item numbers go into their own index

Where to find it Data › List in text flow …

You repeat a paragraph block with data placeholders for each record and flow the list through threaded frames. A long catalogue assortment list then gets the space its text actually needs. Group headings organise product groups, missing pages are added and empty fields can omit their paragraph. Item numbers can be collected in a separate index with page numbers that updates when the list is set again.

How to do it

  1. Load a data source and design a paragraph block with “<<Field>>”.
  2. Place the cursor in that block or select its frame.
  3. Open «Data» › «List in text flow …».
  4. Set grouping and the index and choose «Set».
Compared

Catalogue from data, update for the next edition

Vendor sources, as of 25.9.2026 · Full comparison with all sources

Prices set properly

field formats for number, currency and percent (“CHF 1’234.50”, “12.–”), show or hide objects per field value

Where to find it Data › Data merge

You give data fields a number, currency or percentage format. For a product list, this lets you display amounts with a currency label and round amounts ending in “.–”. Conditions based on field values also control whether an object appears for a record. A catalogue can therefore show a note only for relevant items, and data merge respects this visibility in PDF output too.

How to do it

  1. Open «Data» › «Data merge».
  2. Select the data field and set its number or currency format.
  3. Check several records in the preview.

Bilingual catalogues

an output language picks “Name_fr” and sets numbers and amounts its own way

Where to find it Data › Data merge

You choose an output language for data merge, tiles or flowing lists. In a bilingual catalogue, a placeholder such as “<<Name>>” then uses the “Name_fr” column for French output. Numbers and amounts follow the selected language, and matching language conditions can switch fixed text too. Empty translations are reported, and you duplicate the document and change the output language for separate catalogue editions.

How to do it

  1. Load a list with base fields and language columns such as “Name_fr”.
  2. Open «Data» › «Data merge» and choose «Output language».
  3. Check translated values and numbers in the preview.
  4. Duplicate the document for another language edition.

Tips

  • Check sorting too, as it follows the language column.

Data merge from CSV, Excel or JSON with images, QR code and barcode per record, as a PDF, a ZIP per record or a new document

Where to find it Data › Create merged document …

You load a CSV, Excel or JSON data source and connect its fields to the layout. For personalised agency mailings, text, images, QR codes and barcodes can vary by record. The preview shows individual records before you start the merge. You choose a PDF for all records, individual PDFs in a ZIP or a new editable document as the result.

How to do it

  1. Load the source through «Data» › «Load data source …».
  2. Insert data fields in the template and preview several records.
  3. Open «Create merged document …».
  4. Choose the result type and start output.

Limits: JSON is a read-only data source; writing back to JSON is not supported.

Compared

Data merge

Vendor sources, as of 25.9.2026 · Full comparison with all sources

Labels and envelopes

A4 label sheets to Zweckform and HERMA templates, design one label and data merge fills the sheet; envelopes C5, C5/6, DL and C6 with the address field at the window position and the post office's free coding zone

Where to find it File › New document …

You start with a Zweckform or HERMA A4 label template and design one label. For mailing a club magazine, data merge fills sheet after sheet with addresses. Envelope templates cover C5, C5/6, DL and C6 with the address field at the window position. Templates account for the post office's clear coding zone, and you check placement against the chosen format before printing.

How to do it

  1. Under «File» › «New document …», choose the label or envelope template.
  2. Load the address list with «Load data source …».
  3. Design the address area with data fields and check the preview.
  4. Create output with «Create merged document …».

Tips

  • Print a test sheet and compare it with the actual label sheet or envelope.

Data under control

sort, filter and correct records, pick the sheet in Excel workbooks; “page 1 of 2” restarts for each record

Where to find it Data › Data merge

You sort, filter and correct records in the data panel before output. For an agency mailing, you can review a subset and choose the relevant sheet in an Excel workbook. The preview provides sample values for fields and helps locate records with problems. Merge page numbering restarts for each record, giving each two-page mailing its own page references.

How to do it

  1. Open «Data» › «Data merge» and load the list.
  2. For Excel, select the required worksheet.
  3. Sort or filter records and check the preview.
  4. Use «Next with a problem» to inspect reported records.

Linked sources

tables and texts from Excel, CSV, Word and Google Sheets stay connected, two-way if you like, with write-back

Where to find it Window › Links

You place Excel or CSV tables and Word text as linked content or connect a Google Sheets address. For a recurring annual report, you can refresh source data and review changes. For Word, Medusa can keep its stored copy updated, while Excel and CSV provide a change list for applying to the original. Medusa reads Google Sheets as a source, and formula cells survive linked-table refreshes.

How to do it

  1. Place an Excel, CSV or Word file through «File» › «Place …».
  2. Open «Window» › «Links».
  3. Check the source and refresh the linked content.
  4. Review changes before output.

Limits: Google Sheets cannot be written from here; Excel and CSV use a change list for applying edits to the original.

Compared

Word/Excel linked, write-back

Vendor sources, as of 25.9.2026 · Full comparison with all sources

All in one place

the Data menu with data merge, data sources, lists in the text flow, linked tables and document values

Where to find it Data

The Data menu groups data-source and data-merge work. For a catalogue, it gives you access to loading lists, distributing records and creating a list in the text flow. Data updates, data changes and creating the merged document are also here. Linked tables and document values complete the menu, keeping commands for data-based content in one place.

Colour & prepress

You check the file before the printer does.

Prepress report
Prepress report. Images, vectors, fonts, colors, transparency and bleed in detail, with a jump to the object.
Inspect mode
Inspect mode. Everything locked: prepress sees resolution, color space and distances on the object.
Checking PDF/X
Checking PDF/X. The program reads its own print PDF back and checks it. It is a plausibility check, not a certification.

Prepress with a jump to the object

images, fonts, colours, transparency and bleed in the report, plus inspect mode for sign-off

Where to find it File › Preflight …

The prepress report collects findings about images, vectors, fonts, colours, transparency and bleed. For a magazine, you can find a low-resolution cover image or overset copy before delivery. Clicking an object-related finding takes you to its location, including on master pages. Inspect mode lets you examine resolution, colour space and distances on the object while editing remains locked. Checking leaves the layout and subsequent PDF unchanged, and you make corrections afterwards.

How to do it

  1. Open «File › Preflight …».
  2. Select the relevant category in the report.
  3. Click a finding to jump to its object.
  4. Press ⇧D to enable «Inspection view» for inspection.

Tips

  • Use ⇧D for inspection after reviewing the report findings.
Compared

Live preflight

Vendor sources, as of 25.9.2026 · Full comparison with all sources

Your own preflight profiles

image resolution, thinnest stroke, smallest type, maximum ink, distance to edge and fold, custom text patterns as house rules, as a house preset for the whole team

Where to find it File › Preflight … › Preflight profile …

A preflight profile stores thresholds and the severity of individual checks. For a print shop, set minimum resolution, smallest type, thinnest stroke, maximum ink coverage and distances to edges and folds to match its requirements. Custom text patterns find items such as TODO or double spaces and show their locations in the report. The active profile also applies before output, in the inspector and in books. Save profiles in the document and share them as a file so the team uses the same house rules.

How to do it

  1. Open «File › Preflight … › Preflight profile …».
  2. Use «New profile» to create your profile.
  3. Adjust thresholds and «Custom text patterns».
  4. Click «Save profile».
  5. Share the settings with «Save profiles …».

Tips

  • Agree thresholds with the printer and share the profile together with the output preset.

Limits: Disabled checks leave an explicitly reported gap in the result.

New checks

page count matching the binding, number of spot colours against your profile, leftover placeholder text, objects too close to the trim edge, broken links in the document, characters missing from the font, also markable on the page

Where to find it File › Preflight …

The additional checks compare page count with the binding and count the intended spot colours. In a stitched magazine, this exposes an unsuitable page count or an extra printing plate. Other findings cover placeholder copy, objects near the trim edge and references to missing page destinations or text anchors. You can also mark characters missing from the selected font on the page. Correct the reported locations before export, since the report does not replace copy or characters automatically.

How to do it

  1. Open «File › Preflight …».
  2. Review findings about pages, colours and references.
  3. Use a finding to jump to its location.
  4. For font problems, enable «View» › «Mark missing characters».

Accessibility in view

text-to-background contrast to WCAG, a view simulates colour vision deficiency, readability (LIX) is in the panel; in the tagged PDF, form fields are labelled and formulas are marked up

Where to find it File › Preflight …

The contrast check compares text and background against WCAG at 4.5 : 1, or 3 : 1 for large type. Large type starts at 18 pt, or 14 pt for bold type. For a municipal brochure, check grey captions and white headlines on coloured shapes. A screen view simulates protanopia, deuteranopia, tritanopia or greyscale, while the Design panel displays the LIX readability index. In a tagged PDF, form fields receive labels and formulas receive their own structural tags with alternative text. The vision simulation leaves exports unchanged.

How to do it

  1. Open «File › Preflight …».
  2. Review contrast findings in the report.
  3. Choose a simulation under «View» › «Simulate color vision deficiency».
  4. Read LIX under «Text amount» in the Design panel.

Limits: For images, gradients or ambiguous backgrounds, the contrast check reports that it cannot evaluate contrast.

Print preview plate by plate, computed from the print data

overprint, opacity and spot colours as printed, in Display P3 on suitable screens

Where to find it View › Overprint Preview (⌥⇧⌘Y)

The print preview calculates plates from the same print data used for PDF output. CMYK images keep their channel values, while RGB images pass through their embedded profile. For a magazine cover, check whether a black headline overprints and a spot colour appears on the right plate. Separation preview shows individual plates, and overprint preview shows their combined appearance with opacity. Chrome and Safari can display the preview in Display P3 on suitable screens. The view itself changes no output settings.

How to do it

  1. Open «View › Overprint Preview».
  2. Choose a plate under «View» › «Separations preview».
  3. Compare spot colour and black with the combined print.

Tips

  • Use ⌥⇧⌘Y to toggle overprint preview.

Limits: Spot-colour mixing is approximate, the Hue, Saturation, Color and Luminosity blend modes are not exact, and Firefox displays only sRGB.

Compared

Separation and overprint preview

Vendor sources, as of 25.9.2026 · Full comparison with all sources

Spot colours in CMYK, Lab or RGB on their own plate, in gradients too; the ink manager merges spot colours or converts them to process for output only

Where to find it View › Separations preview › Inks …

Spot colours can carry a CMYK, Lab or RGB alternate value and form their own plate in the print PDF. A gradient can also use a spot-colour plate. For an agency brochure, check in the ink dialog whether different names refer to the same brand ink. An alias puts these spot colours onto one plate for output. Conversion to process colours also acts on output and preserves the document swatches.

How to do it

  1. Open «View › Separations preview › Inks …».
  2. Choose a common alias for duplicate spot colours.
  3. Check the plates under «View» › «Separations preview».

Limits: Screen frequency, screen angles, calibration curves and trapping are outside the ink manager’s scope.

Compared

Ink manager: alias, convert to process

Vendor sources, as of 25.9.2026 · Full comparison with all sources

Colour management with ICC profiles

print profile per document, ECI profiles ISO Coated v2, PSO Uncoated and ISO Newspaper included, soft proof with paper white

Where to find it File › Document setup … (⌥⌘P)

The document stores its own CMYK print profile and RGB working space. Included ECI profiles cover ISO Coated v2, PSO Uncoated and ISO Newspaper. For a book, choose the profile matching the intended paper and printing condition. Soft proofing approximates RGB colours and images in the print space, and paper simulation includes paper white and print black. For print PDF output, Medusa can convert RGB content to the print profile and embed it as the output intent.

How to do it

  1. Open «File › Document setup …».
  2. Open «the «Color» tab».
  3. Choose «Print profile (CMYK)» and «RGB working space».
  4. Enable «View» › «Proof colors» › «Proof colors: simulate print».
  5. Enable «Simulate paper» there when needed.

Tips

  • Load the printer’s profile matching the production printing condition.

Limits: For binding print jobs, use the printer’s profile, since the supplied profiles are standard profiles.

Compared

Colour management with ICC profiles

  • Medusa partlyprint profile per document, output managed; normal view not
  • Adobe InDesign available
  • QuarkXPress available
  • Affinity Studio available

Vendor sources, as of 25.9.2026 · Full comparison with all sources

Images in the right colour

RGB through its own profile into the print profile, untagged through the working space; CMYK images stay unchanged

RGB images with an embedded profile pass through it into the print colour space. When the profile is missing, Medusa uses the document’s RGB working space as the source. For a photography book, this lets you output images from different sources under one printing condition. CMYK images retain their existing channels instead of passing through RGB again. Review soft proofing and the channels in separation preview before delivering the print PDF.

Overprint for fill, stroke and black text

100 % black overprints by itself everywhere (underlines, paragraph rules, table rules, path text and formulas too), white never does; 1-bit line art stays sharp on the black plate

Medusa supports overprint for fills and strokes and automatically treats pure 100 % black as overprinting. This rule also applies to underlines, paragraph rules, table rules, path text and formulas. White elements never overprint, so they knock out visibly in print. For a magazine, check small black copy over a coloured area without setting a separate rule for every line. One-bit line art stays sharp in the print PDF and uses the black plate.

Tips

  • Check black over a coloured area using overprint preview.

Transparency that prints

shadows and feathered edges keep their colour: black stays black, spot colours stay on their plates, the object stays vector

Shadows and feathered edges retain their colour through to the print PDF. A black shadow stays on black, and a spot-colour shadow uses its own plate. The object itself remains a vector. For a book cover with a spot colour, you can use a feathered edge and inspect its separation. Transparency therefore retains the same colour assignment as its design element.

Opacity and blend mode for object, fill, stroke and content, on screen as in the PDF; isolated and knockout groups

Where to find it Window › Design

Set opacity and blend mode for the whole object or separately for fill, stroke and content. In an agency brochure, copy can remain opaque while its frame fill is translucent. Groups can carry opacity, shadows and feathering as a whole. Isolated groups limit interaction with the background, and knockout groups control knockout within the group. The PDF carries these transparency settings, and print preview lets you review their effect before output.

How to do it

  1. Open «Window › Design».
  2. Select the object or group.
  3. Adjust «Opacity» and «Blend mode» for the required part.
  4. Check the result under «View» › «Overprint Preview».

Colour picker by colour space

CMYK with ink coverage, spot colours with tint, RGB, OKLCH and Display P3; load and save palettes as .ase, .aco and .gpl

Where to find it Window › Swatches

The colour picker shows controls suited to the selected colour space. CMYK displays four channels and total ink coverage, while a spot colour exposes its tint. RGB, OKLCH and Display P3 are available for screen colours. In an agency, load existing ASE, ACO or GPL palettes and save document colours in those formats. This lets you reuse defined values in other designs and check the chosen print profile for print output.

How to do it

  1. Open «Window › Swatches».
  2. Open «the required swatch for editing».
  3. Choose the colour space and enter channel values or tint.
  4. Confirm the colour and review ink coverage for CMYK.

Spot channels from Photoshop print on their own plate, CMYK images keep their profile

When placing a PSD with supported spot channels, Medusa creates a swatch named after each channel. Output carries that channel as its own printing plate. For a packaging brochure, carry an extra printing ink from image editing into the layout. Separation and overprint preview show the corresponding plate. CMYK images retain their profile and CMYK values for print output.

Limits: Documented spot-channel support covers greyscale and CMYK PSD files.

Compared

Photoshop layers and spot channels

Vendor sources, as of 25.9.2026 · Full comparison with all sources

A prepress test document as an example

pages with spot colours, overprint, transparency, line art and 16-bit images; each says what the result must be

Where to find it To overview › Prepress test document

The prepress test document contains 16 pages of deliberately constructed print cases. It includes CMYK, Lab and RGB spot colours, overprint, transparency, line art, and 16-bit, CMYK and RGB images. Placed PDFs and an OTF font are also part of the example. Each page explains its purpose and expected result at the top so you can compare the screen with the exported PDF. For training in a print shop, use the ink coverage, small type, hairline and image resolution cases. Deliberate findings help you interpret the prepress report.

How to do it

  1. On the overview, open «Prepress test document».
  2. Read the page’s test purpose and expected result.
  3. Export the PDF through «File» › «Export …» and compare the result.

Export & publishing

One document, many outputs: print PDF, flipbook, form or image.

PDF forms
PDF forms. Text fields, check boxes, lists and buttons in the layout; the PDF is fillable.
Print example
Print example. Four A4 pages with typesetting, a table, formulas, spot colour, bleed and a form.

A print PDF that checks itself

built to PDF/X-4, the label is only set when the built-in check passes; otherwise the export says why. Not an independent certification

Where to find it File › Export …

Print export builds the PDF according to PDF/X-4 and then checks the finished file. The check reads back the output intent, embedded fonts, colour spaces and page boxes among other properties. For a magazine delivery, this shows whether the generated file meets the built-in requirements. The PDF/X-4 identification appears in the file only after the check passes. Otherwise, export explains the reasons so you can make corrections before delivery.

How to do it

  1. Open «File › Export …».
  2. Choose PDF and set «Default» to PDF/X-4.
  3. Review the summary and start with «Export».
  4. Read the check result before delivery.

Limits: The built-in plausibility check is not an independent certification and does not replace the printer’s preflight.

Compared

PDF/X-4

Vendor sources, as of 25.9.2026 · Full comparison with all sources

Print and accessibility in one file

PDF/X-4 and PDF/UA at once, both labels only after the check passes

Where to find it File › Export …

The combined output preset joins a print PDF with a structure tree for accessible reading. For a municipal brochure, prepare one file for printing and accessible distribution. The PDF carries the print profile as its output intent and organises content in the structure tree. Medusa checks PDF/X-4 and PDF/UA on the same finished file and writes only the identifications that pass. This preset retains bookmarks.

How to do it

  1. Open «File › Export …».
  2. Under «PDF preset», choose «Print and accessible (PDF/X-4 + PDF/UA)».
  3. Check page range, bleed and marks.
  4. Click «Export» and read both check results.

Limits: This preset omits links, forms and comments and provides no independent PDF/X certification.

Compared

PDF/X-4

Tagged, accessible PDF

Vendor sources, as of 25.9.2026 · Full comparison with all sources

Order print

create the PDF from a preset, check it and send it to the printer as a link, with run, size, paper and deadline; the link expires and can be withdrawn

Where to find it File › Order print …

Ordering print generates a PDF from the chosen preset and checks it before sending. Add the printer, run, size, paper and deadline so the production details accompany the document. For an agency job, the printer receives a link to the generated PDF together with these details. The link expires and can be withdrawn. The order therefore combines the output file and production information without requiring you to assemble a separate attachment.

How to do it

  1. Open «File › Order print …».
  2. Choose «Print shop» and «PDF preset».
  3. Fill in «Quantity», «Format», «Paper» and «Event».
  4. Review the details and start with «Order».
Compared

Order print from the app

Vendor sources, as of 25.9.2026 · Full comparison with all sources

A flipbook online in one click

spreads, swiping on phones, search across the whole catalogue, a PDF to download, films, QR code and embed code, or as a ZIP

Where to find it File › Export …

The flipbook displays your document as a browsable edition in the browser. For a product catalogue, use spreads, thumbnails, search and swipe gestures on phones. Offer films and a downloadable PDF, and provide access through a QR code or embed code. Online publishing returns a link to the catalogue. Alternatively, export a ZIP containing the viewer to distribute as an output package.

How to do it

  1. Open «File › Export …».
  2. Choose «Flipbook» as the format.
  3. Enable «Offer PDF for download» if needed.
  4. Choose «Publish online» or download the ZIP with «Export».

Tips

  • Use a screen preset for the downloadable PDF to retain links.
Compared

Page-flip catalogue for the web

Vendor sources, as of 25.9.2026 · Full comparison with all sources

Vector PDF with embedded fonts, bleed per edge, crop and registration marks and a slug line, optionally with switchable layers; export presets for the team, the PDF is made in the background and needs less memory for large documents

Where to find it File › Export …

PDF export retains text and suitable artwork as vectors and embeds the fonts used. For a book cover, set bleed per edge and add crop marks, registration marks and an information line. Medusa can write document layers as switchable PDF layers when needed. Export presets live in the document, can be exchanged as files and are available to the team. The PDF is generated from a document snapshot in the background while you keep working. For large documents, images are packed in chunks to reduce memory use.

How to do it

  1. Open «File › Export …».
  2. Choose PDF and the appropriate «PDF preset».
  3. Check «Crop marks», «Registration marks» and bleed per edge.
  4. Enable «Write layers to the PDF» when needed.
  5. Start background output with «Export».

Limits: This feature does not import layers from placed PDF pages as switchable document layers.

Compared

Layers in PDF

  • Medusa availableswitchable layers, with PDF/X-4 too; non-printing layers only in the screen PDF, otherwise they are left out
  • Adobe InDesign available“Create Acrobat Layers”↗ Adobe: Adobe PDF export options (Create Acrobat Layers)
  • QuarkXPress no reliable statement
  • Affinity Studio no reliable statement

Vendor sources, as of 25.9.2026 · Full comparison with all sources

In-depth PDF check

output intent, ICC and Lab colour spaces, fonts, layers, resolution and ink coverage, other people's PDFs too

Where to find it File › Check PDF/X …

PDF checking reads a finished file and examines its print properties. These include output intent, ICC and Lab colour spaces, embedded fonts, layers and page boxes. The preflight profile adds production findings about effective resolution, ink coverage, small type and hairlines. In a print shop, check supplied PDFs as well as your own export. The report separates technical findings from prepress thresholds and identifies locations where the check can associate them.

How to do it

  1. Open «File › Check PDF/X …».
  2. Read the report for the generated PDF.
  3. For a supplied PDF, click «Check another file …».
  4. Select the PDF file and review the report findings.

Limits: The check remains a plausibility check and does not replace independent certification.

Compared

Check someone else’s PDF

  • Medusa partlyplausibility check in the browser, with preflight profile; not certified
  • Adobe InDesign no reliable statement
  • QuarkXPress no reliable statement
  • Affinity Studio partlyopen it, then preflight↗ Affinity: Preflight

Vendor sources, as of 25.9.2026 · Full comparison with all sources

Interactive PDF

fillable forms with text fields, check boxes, lists, signature and required fields, buttons with actions, films and page transitions

Where to find it File › Export …

Interactive PDFs can contain text fields, check boxes, lists, signature fields and required fields. For an agency registration form, create fields in the layout and give them understandable names. Buttons can trigger actions, and output can include films and page transitions. During export, choose whether forms and media remain in the file. Check the finished file in the PDF viewer used by recipients to assess how the form works.

How to do it

  1. Open «File › Export …».
  2. Choose PDF without the PDF/X-4 standard.
  3. Enable «Forms and media» and any required «Hyperlinks».
  4. Click «Export» and test the PDF fields.

Limits: PDF/X-4 output omits interactive forms and media.

Compared

PDF form fields

Vendor sources, as of 25.9.2026 · Full comparison with all sources

Printer spreads, gatefolds and imposition for saddle stitching; each page as its own PDF

Where to find it File › Export …

You can output related pages as printer spreads and retain attached gatefolds within the spread. For a brochure, imposition arranges pages on sheets for saddle stitching. This lets you check which pages share a sheet before folding. If the printer needs separate files, export each page as its own PDF in a ZIP. These options change the arrangement in the output file while you continue working with the original document pages.

How to do it

  1. Open «File › Export …».
  2. Choose PDF as the output format.
  3. Enable «Spreads (facing pages on one sheet)» or «Impose as a booklet or arrange pages on a sheet».
  4. For separate files, choose «Each page as its own PDF (ZIP)» instead.
  5. Review the selection and click «Export».

Limits: Imposition here supports saddle stitching, not imposition for folded products.

Compared

Imposition

Vendor sources, as of 25.9.2026 · Full comparison with all sources

PNG, JPEG and SVG per page; EPUB and HTML with embedded fonts where the font file allows it; package as a ZIP with images and fonts

Where to find it File › Export …

Choose PNG, JPEG or SVG for per-page image output. An agency can generate previews and reusable page graphics from the same layout. EPUB and HTML output the text flow and can embed the fonts used when the font file permits it. Export reports fonts omitted because of embedding permissions. To hand over the editable production, package the document with images and fonts in a ZIP.

How to do it

  1. Open «File › Export …».
  2. Choose PNG, JPEG or SVG and the page range.
  3. For text flow, choose EPUB or HTML and review «Embed fonts».
  4. Click «Export» and read any font notices.

Limits: EPUB and HTML output text flow rather than fixed document pages, and restricted fonts are not embedded.

Compared

EPUB

Package

Vendor sources, as of 25.9.2026 · Full comparison with all sources

Output automation

workflows with presets, variables in the file name (_print, _web), batch output across several documents; one run creates a file per language version or condition, the PDF also with all languages as switchable layers

Where to find it File › Book and output › Plan output …

Output automation groups recurring exports in a workflow. Define presets and filenames with variables, such as separate names for print and web files. For an agency handling several language versions, one run creates a file per version or condition. Alternatively, a PDF can contain all language versions as switchable layers. Batch output handles multiple documents, and a history shows results and reported preflight findings.

How to do it

  1. Open «File › Book and output › Plan output …».
  2. Create a workflow with «New».
  3. Use «Add output» and set «PDF preset» and «File name».
  4. Use «Add version» to set layers and conditions for each version.
  5. Start with «Output» and review «History …» afterwards.

Limits: Accessible or imposed PDF output includes only the displayed language version.

Animation & web

The same design in motion, for social media, screens and Google Ads.

Timeline with keyframes
Timeline with keyframes. In, out, loop and custom keyframes for offset, size, rotation and opacity.
HTML5 ads
HTML5 ads. Standard sizes, clickTag, live checks and a ZIP that Google Ads accepts.
WebGL example
WebGL example. Your own GLSL shader as a surface, connected to the timeline.

HTML5 ads for Google Ads

standard sizes, clickTag, a live checklist, a backup image and a ZIP that Google Ads accepts

Where to find it File › More formats › Export as HTML5 ad …

Ad export creates an HTML5 package from the designed page and its animations. For an agency campaign, choose a standard size and review the live checklist before delivery. The Google Ads profile makes the whole area clickable, with the destination set in the advertising account. Other supported ad servers can use a clickTag profile with a destination in the export dialog. Include a JPG backup image when needed and download a ZIP containing the required files. Export also reports errors to resolve before uploading.

How to do it

  1. Open «File › More formats › Export as HTML5 ad …».
  2. Choose «Profile» and, for the clickTag profile, «Click target (clickTag)».
  3. Enable «Include backup image (JPG)» when needed.
  4. Click «Export» and review reported errors before uploading.
Compared

HTML5 ads for Google Ads

Vendor sources, as of 25.9.2026 · Full comparison with all sources

Timeline with keyframes

ins and outs, loops and your own keyframes for offset, size, rotation and opacity

Where to find it Window › Animation › Timeline (⌥⌘T)

The timeline assigns animations to objects on the current page. Combine ins, outs and loops, or set custom keyframes for offset, size, rotation and opacity. For an animated agency ad, let the headline appear first, followed by the product and then the call to action. Start and duration determine the sequence, and the playhead displays the current state on the page. Play the motion and adjust it before export. Video and animated HTML use the movement defined in the timeline.

How to do it

  1. Open «Window › Animation › Timeline».
  2. Select an object on the page.
  3. Use «+ Animation» to add an in, out or loop.
  4. Adjust the clip’s start and duration.
  5. Review the sequence with «Play».

Tips

  • Use ⌥⌘T to open or close the timeline.
Compared

Timeline and video (MP4)

Vendor sources, as of 25.9.2026 · Full comparison with all sources

Export as video (MP4, WebM) or animated HTML

Where to find it Window › Animation › Timeline (⌥⌘T)

The timeline exports the current page’s animation as video or animated HTML. For an agency social post, obtain MP4 with H.264 or WebM with VP9 depending on the browser. Where WebCodecs is available, Medusa renders individual frames and encodes them at the selected bitrate. Otherwise it uses the browser’s supported real-time recording. Export shows progress and allows cancellation. Animated HTML retains the movement as browser output.

How to do it

  1. Open «Window › Animation › Timeline».
  2. Review «Duration (s)» and «Frames/s».
  3. In the timeline, choose «Export» › «Video (MP4/WebM) …».
  4. For browser output, choose «Animated HTML …» instead.

Limits: Audio, video editing and multiple video tracks are outside this export’s scope, and the task documentation leaves video colour fidelity unverified.

Compared

Timeline and video (MP4)

Vendor sources, as of 25.9.2026 · Full comparison with all sources

WebGL surfaces with your own GLSL shader and Lottie animations; they keep running in the export

WebGL surfaces generate moving graphics, and you can enter custom GLSL code with a preview and error messages. Place Lottie files as animations with their aspect ratio. For an agency ad, add a moving background or prepared vector animation to the layout. Both follow the timeline and keep running in HTML and HTML5 ad output. In the PDF, Medusa rasterises the state at the playhead, producing a still image.

How to do it

  1. Drag a Lottie JSON file onto the page.
  2. Open «Timeline» with ⌥⌘T and check the animation with «Play».
  3. In the timeline, choose «Export» › «Animated HTML …» for animated browser output.

Tips

  • For PDF output, position the playhead at the still image you want before exporting.

Limits: The PDF contains a rasterised still image for WebGL and Lottie, without motion.

Compared

WebGL surfaces with custom shaders

  • Medusa availablealso in HTML and video export
  • Adobe InDesign no reliable statement
  • QuarkXPress no reliable statement
  • Affinity Studio no reliable statement

Vendor sources, as of 25.9.2026 · Full comparison with all sources

49 formats for print, social media, web and video, screen formats with exact pixel sizes

Where to find it File › New document …

The size catalogue offers 49 formats for print, social media, web and video. When creating a document, choose a suitable size, such as a print page or screen format for an agency campaign. Screen formats transfer their exact pixel dimensions into the document. This starts an ad at its intended width and height before you add objects and animations. A custom size accepts dimensions for other requirements.

How to do it

  1. Open «File › New document …».
  2. Choose the category for your output in the size catalogue.
  3. Choose the size and check width and height.
  4. For «Custom size», adjust dimensions and create the document.

Colours for modern screens

OKLCH and Display P3 in the web export, with hex as a fallback

For screen design, enter colours in OKLCH or Display P3. Medusa retains the entered values and also stores an sRGB fallback. Web export includes the modern colour values with hex as a fallback. For the web edition of an agency brochure, define colours for suitable screens while supplying a fallback value. Appearance depends on the screen’s colour gamut and browser support.

AI

The AI suggests, you compare and decide.

Translating with AI
Translating with AI. Pick the target language, get a language layer or a duplicate of the document.

Translate whole documents

as a language layer or a duplicate, free without a key or with Gemini, Anthropic, OpenAI or DeepL

Where to find it AI › Translate document …

Document translation processes text paragraphs and offers the result as a language layer or document duplicate. For a multilingual agency catalogue, the layout, images and styles remain while you review the translated copy. A language layer keeps versions together in one document, while a duplicate puts the translation in a separate document. Choose the service without a key or Gemini, Anthropic, OpenAI and DeepL. After translating, check line breaks and overset text because another language may require more space.

How to do it

  1. Open «AI › Translate document …».
  2. Choose «Target language».
  3. Under «Result», choose a language layer or duplicate.
  4. Start with «Translate», then check line breaks and overset copy.

Limits: The dialog describes the service without a key as intended for short texts.

Compared

Translate a whole document

  • Medusa availableas language layer or duplicate
  • Adobe InDesign no reliable statement
  • QuarkXPressQuarky translates text↗ Quark: A Guide to QuarkXPress 2025
  • Affinity Studio no reliable statement

Vendor sources, as of 25.9.2026 · Full comparison with all sources

Shorten with a trial setting

see live whether the text fits, cut to any length you choose; undo each cut on its own

Where to find it AI › Shorten text

When shortening, Medusa compares the suggestion with the existing copy and trial-sets it in the layout. For a magazine article, selecting cuts shows whether it fits its frames and how many lines are still missing or available. Distribute cuts, shorten from the end or specify a character count even without overset text. You can undo each cut individually, and existing character styles survive shortening. Accepting changes updates the document text, and active change tracking records the individual deletions.

How to do it

  1. Select the copy to shorten.
  2. Open «AI › Shorten text».
  3. Under «Text amount», choose the scope and shortening direction.
  4. Click «Suggest cuts …».
  5. Select cuts and review the trial setting.
  6. Confirm with «Apply».

Tips

  • Enable change tracking if editors need to review individual deletions afterwards.

Limits: Shortening requires a supported text provider such as Gemini, Anthropic or OpenAI, and is unavailable through the translation service without a key or DeepL.

Compared

Rewrite, shorten, suggest titles

Vendor sources, as of 25.9.2026 · Full comparison with all sources

Suggest text

a new headline or copy in three variants, fine-tuned by hand before you accept

Where to find it AI › Suggest text …

Text suggestions generate three variants for a headline, a headline-and-subheading pair or body copy. The source is the paragraph containing the cursor or the text in a selected frame. For a magazine opener, set tone, length and an additional instruction. Compare the variants with the existing copy and edit the chosen version by hand before accepting it. The character count helps you match the suggestion to the available space. Accepting it creates one undoable change.

How to do it

  1. Select a text frame or place the cursor in a paragraph.
  2. Open «AI › Suggest text …».
  3. Choose «Kind», «Tone» and «Length».
  4. Generate suggestions and compare the three variants.
  5. Edit the selected variant and confirm with «Apply».

Tips

  • For an empty frame, enter a content instruction for the suggestion.

Limits: Paragraphs containing fields remain untouched, and character styles in the replaced paragraph are lost when accepting a suggestion.

Compared

Rewrite, shorten, suggest titles

Vendor sources, as of 25.9.2026 · Full comparison with all sources

Alt texts for all images in one pass; nothing is applied until you confirm

Where to find it AI › Suggest alt texts …

Request suggestions for all missing image descriptions in one pass. Medusa creates one suggestion per image file and shows it before acceptance. For an illustrated agency annual report, review descriptions together instead of opening every image individually. Deselect unsuitable suggestions and apply only the confirmed texts. These alternative texts support accessible output but still require your editorial review of image meaning and context.

How to do it

  1. Open «AI › Suggest alt texts …».
  2. Generate suggestions for missing alternative texts.
  3. Review descriptions and deselect unsuitable ones.
  4. Confirm the selection with «Apply».
Compared

Suggest alt text

Vendor sources, as of 25.9.2026 · Full comparison with all sources

Remove backgrounds in the browser with a free model

the image never leaves your computer, it costs nothing, the original stays

Where to find it AI › Remove background

The command removes a placed image’s background using a model in the browser. For an agency catalogue, place a product against a coloured area without overwriting the original. The result receives transparency, and the original remains available for restoration. For CMYK images, Medusa applies the calculated mask to the original data so CMYK values survive in the print PDF. Undo the operation or restore the original to remove the result.

How to do it

  1. Select a placed image frame.
  2. Open «AI › Remove background».
  3. Wait for the result and check edges against a coloured area.
  4. To revert, choose «AI» › «Restore original».

Tips

  • Check the cut-out edge against a dark area too.

Limits: Manual mask retouching is outside the scope documented for this feature.

Compared

Remove background

Vendor sources, as of 25.9.2026 · Full comparison with all sources

All helpers in the AI menu, with your own provider key; it stays in the browser

Where to find it AI › AI settings …

The AI menu groups text suggestions, shortening, document translation, alternative texts and background removal. Choose a provider for the task in the AI settings. For agency brochure copy, use a provider supporting text suggestions or shortening, while translation allows additional providers. Image descriptions require a provider with image understanding. Review suggestions in the relevant working dialog and decide whether to apply them. The settings therefore determine which helpers are available for your next task.

How to do it

  1. Open «AI › AI settings …».
  2. Choose a provider for the intended task.
  3. Then open the required helper in the «AI» menu.

Import & exchange

Bring your existing work: IDML, PDF, Word and Photoshop.

Linked sources
Linked sources. Excel, CSV, Word and Google Sheets stay connected, two-way if you like.

IDML in and out

pages, parent pages, threaded frames, styles, spot colours (Pantone as Lab), groups with effects, tables with widths and cell strokes, footnotes

Where to find it File › More formats › Export as IDML …

IDML carries pages, master pages, threaded text frames, styles and groups between layout files. Tables retain their widths and cell strokes, and footnotes remain footnotes. Spot colours retain their identity, with Lab values for Pantone colours. You can continue an existing magazine layout and return it as IDML afterwards. Export produces a ZIP containing the IDML file and linked images in a Links folder.

How to do it

  1. Choose File › Import … and open the IDML file.
  2. Review the import report and supply missing images or fonts.
  3. Choose File › More formats › Export as IDML …

Limits: The import report lists simplified or omitted content; IDML does not cover every object type.

Compared

IDML import and export

Vendor sources, as of 25.9.2026 · Full comparison with all sources

IDML without silent loss

not a single word is lost, not even in links, cross-references and text variables; layers, crops, images in shapes and anchored objects come along, a report names anything that could not be carried over

Where to find it File › Import …

The IDML importer also reads text inside links, cross-references and text variables. Layers retain names, visibility and locking, while images retain their crops and frame shapes. Anchored objects enter the document with the text. When taking over a book chapter, you can check the report for omitted or simplified elements. The report groups findings by type and gives their count and first page.

How to do it

  1. Open the IDML file through File › Import …
  2. Read the notices after opening and use Show report when offered.
  3. Check the pages listed and copy the report for the handover.

Limits: Cross-references, wrap around shapes and pasteboard objects may be simplified; XML structure and tracked changes are not retained as such.

Open and edit PDFs

fills, curves, text and images become objects, identically set text gets styles with meaningful names, tables across two pages become one

Where to find it File › Import …

Opening a PDF creates editable fills, curves, text and images. Text with matching formatting receives shared styles named after its appearance. Recognised tables spanning two pages are combined into one table. This helps an agency when only the PDF of an older brochure remains. After corrections, you export the resulting layout through the normal export.

How to do it

  1. Choose File › Import … and select the PDF.
  2. In the PDF opening dialog, enable the options you need for styles and tables.
  3. Check text, tables and fonts in the resulting document.
  4. Correct the objects and export the new version.

Limits: Editable PDF import approximates the original appearance and replaces fonts; check line breaks afterwards.

Compared

Open and edit PDF

Vendor sources, as of 25.9.2026 · Full comparison with all sources

Place PDFs at original size, linked, as vectors or inserted as editable objects

Where to find it File › Place … (⌘D)

You can place a whole PDF page in an image frame or import its objects for editing. The placed frame starts at the PDF page’s original size. For a supplied magazine advert, placement keeps the PDF file as its source. The screen shows a preview, while the placed page remains vector in the print PDF. Editable insertion separates paths, text and images into individual objects in a group. With “Place linked”, you can later insert a new version through “Verknüpfung aktualisieren”.

How to do it

  1. Choose File › Place … and select the PDF.
  2. Choose Place, Place linked or Insert editable.
  3. Select the PDF page and place it in the layout.

Tips

  • Place the whole page for a finished print advert.

Limits: Insert editable replaces fonts.

Word with style mapping

map Word styles to the document's styles, the mapping is remembered; Markdown and plain text with autoflow; text goes to Word with paragraph styles, emphasis, links and lists and comes back the same when read in and refreshed, shared Google documents can be linked as text

Where to find it File › Place … (⌘D)

When placing a Word file, you map its paragraph and character styles to the layout’s styles. Medusa remembers the mapping for the next import and source refresh. Markdown and plain text can fill new pages and threaded text frames through autoflow. For a book manuscript, this lets you map editorial headings to the house design. Word exchange carries paragraph styles, emphasis, links and lists, and shared Google documents can be linked as refreshable text sources.

How to do it

  1. Select a text frame or place the text cursor.
  2. Open File › Place … and select the text file.
  3. Map the offered styles for a Word file.
  4. Check text flow and the source link after import.

Limits: Creating a new mapped style bases it on the body style; it does not copy the complete Word style design.

Compared

Word/Excel linked, write-back

Vendor sources, as of 25.9.2026 · Full comparison with all sources

Open Word files from the start page

headings become paragraph styles, its own entry point for anyone coming from Microsoft Publisher

Where to find it Open Word file

You can open a Word file directly from the start page as a new document. Headings become paragraph styles that you can develop in the layout. The entry point for people moving from Microsoft Publisher offers this route alongside opening a PDF. For an association magazine, you can start with the manuscript you already have. You then continue in the editor with the resulting text frames and styles.

How to do it

  1. Open the start page.
  2. Click Open Word file.
  3. Select the Word file and check the paragraph styles created.

Photoshop layers recomputed

masks, blend modes, 16 bit, levels, curves, drop shadows; layered TIFF, place AI, clipping paths from PSD and TIFF become the shape of the image frame; CMYK stays CMYK

Where to find it File › Place … (⌘D)

When loading a Photoshop file, Medusa recomputes layers with masks, blend modes and supported adjustments. These include 16-bit images, levels, curves and drop shadows. Layered TIFF files and placed AI files are also supported. A clipping path from PSD or TIFF can supply the image frame’s shape, for example for a cut-out catalogue product. CMYK image data stays CMYK and provides the basis for print output.

How to do it

  1. Choose File › Place …
  2. Select the PSD, TIFF or AI file and place it.
  3. Check appearance, frame shape and colour in the layout.
Compared

Photoshop layers and spot channels

Image in any shape

Vendor sources, as of 25.9.2026 · Full comparison with all sources

Batch import

many IDML, PDF and package files into documents at once, errors reported per file

Where to find it From file …

The document overview can import several IDML, PDF and package files in one run. Each file becomes a separate document. A notice shows progress during import, and errors are collected per file. An agency can use this to bring in several back issues for further editing. After the run, you can see which files succeeded and which need another check.

How to do it

  1. Open the document overview and click From file …
  2. Select several IDML, PDF or package files.
  3. Read the completion notice and open the resulting documents.

Tips

  • You can also drag the files onto the overview.

Place many images at once, click by click or as a contact sheet with captions over as many pages as needed; files over 32 MB upload in parts

Where to find it File › Assemble › Contact sheet …

You can select several images for placement and then drop them into the layout click by click. For a picture selection, the contact sheet arranges files in a grid within the type area. You set columns, spacing, cell format and fitting, plus captions from file names or metadata. Medusa adds further pages when one page is not enough. Files over 32 MB upload in parts, allowing large image files to be used.

How to do it

  1. Open File › Assemble › Contact sheet …
  2. Select the files under Images.
  3. Set columns, spacing and fitting, and enable Caption if needed.
  4. Click Create and check the resulting pages.

Tips

  • One undo removes the entire contact sheet operation.

Links at a glance

all images and PDFs with page and status, replace a file in every frame at once

Where to find it File › Links › Show palette

The Links panel lists images and placed PDFs with their page and status. You can use it to review a brochure’s sources before delivery. When a layout uses the same file several times, you can replace its source across all affected frames together. The frames stay in the document and show the new file. Check cropping and resolution at the places where it is used afterwards.

How to do it

  1. Open File › Links › Show palette.
  2. Select the source in the list and check page and status.
  3. Use the replacement control and select the new file.

Images from other systems

browse, preview and place from network folders over WebDAV or HTTP and from Adobe Experience Manager

Where to find it Place image from a source …

Image sources connect the layout to a network folder over WebDAV or HTTP and to Adobe Experience Manager Assets. You browse the source, preview files and place the chosen image. This helps an agency using product pictures from a shared image library. Placement loads the file into the document and remembers where it came from. Updating the link later fetches the new version from the same source.

How to do it

  1. Use command search to open Place image from a source …
  2. Choose the Source and browse its images.
  3. Check the preview and place the chosen image.

Load styles from another document

swatches, paragraph, character, object, table and cell styles, each marked “new”, “differs” or “same”, in one step

Where to find it Load styles from …

You can load swatches and paragraph, character, object, table and cell styles from another document. The dialog marks each entry as new, different or already identical. You select the entries you need and apply them together. For a new magazine issue, this lets you reuse the previous issue’s design. New entries are added, while selected differing entries update existing definitions.

How to do it

  1. Open Load styles from … through command search.
  2. Choose the source under Document.
  3. Tick the entries you need and click Apply.

Limits: Only documents accessible to this browser are available.

Layout & workflow

Familiar tools and fewer clicks, with nothing to install.

Five interface styles
Five interface styles. The same editor in five styles: «Figma» sober and compact, «Spectrum» with more air, «Studio» dense and grey, plus «Mac» and «Windows» that feel like home. Each comes light and dark. You choose on first launch and can switch later.
Format catalogue
Format catalogue. 49 formats for print, social media, web and video, screen formats with exact pixel sizes.
Creating guides
Creating guides. Columns and rows with gutters, relative to page or type area, colours of your choice.
Outline view
Outline view. ⌘Y shows every object as a hairline: find hidden frames and pick them by their outline. On screen only, the PDF stays untouched.
Split window
Split window. Two views of the same document: detail on the left, the whole spread on the right.
Tidying up a document
Tidying up a document. The assistant turns identical overrides into styles, merges duplicates and removes what is unused. A preview first, a single undo afterwards.

One layout, many formats

a format variant recalculates it, adaptation rules per object; the logo stays top right, the background fills, text stretches

Where to find it Layout › Format variant …

A format variant recalculates existing pages for another target size. Adaptation rules determine how each object’s position and size follow, such as a top-right logo or a full background. Text and table frames can change proportions and their contents reflow. An agency can turn a poster into a card or a square version this way. You can add new pages or change the whole document, then inspect any reported overset text.

How to do it

  1. Choose Layout › Format variant …
  2. Set Target format, Scope and Font size.
  3. Click Convert and review notices about overset text and objects outside the page.

Limits: Conversion is a one-time operation; later changes to the original do not update the variant.

Compared

Convert layout to another format

Vendor sources, as of 25.9.2026 · Full comparison with all sources

A Properties panel that follows your selection

what matters for the selected object first, rarer settings folded away below

Where to find it Window › Properties

The Properties panel follows your selection. It brings different settings forward for an image, text or a table. Common settings appear first, with further options in expandable sections below. While designing a magazine page, you can switch between cropping, text and frames and work on the selected object. Changes to object properties belong to the layout and affect its output.

How to do it

  1. Open Window › Properties.
  2. Select the object on the page.
  3. Change the available values and expand further sections as needed.
Compared

Properties panel by selection

Vendor sources, as of 25.9.2026 · Full comparison with all sources

Tidy-up assistant

identical overrides become styles, duplicates merge, unused items go, with a preview and a single undo

Where to find it File › Tidy up document …

The tidy-up assistant turns recurring formatting overrides into shared paragraph or character styles. It can merge duplicate styles and swatches, resolve redundant overrides and remove unused items. A preview shows the planned changes before you apply them. An editorial team can use it to organise a design that has accumulated variations over several issues. A single undo step reverses the entire run.

How to do it

  1. Choose File › Tidy up document …
  2. Select the tasks and the minimum number of matching paragraphs.
  3. Review the preview and click Tidy up.

Tips

  • Use ⌘Z to undo the run as a whole.

Pages with their own size, gatefolds, double gatefolds, roll and zigzag folds with a fold preview

Where to find it Layout › Page size …

Individual pages can differ from the document’s base size. Combined with gatefold panels, this supports double gatefold, roll and zigzag folds. The fold preview shows how the outer panels fold in. A print shop can check a cover with flaps or a multi-panel leaflet in context. Each page gets its own page boxes in the PDF, and spreads with flaps can be output as spreads.

How to do it

  1. Select the page and open Layout › Page size …
  2. Set the page size and add the required flaps through the pages panel.
  3. Check the folded spread in the fold preview.
  4. Choose the appropriate flap-spread output when exporting the PDF.

Name and hide pages

hidden pages are left out of the output; top binding, for calendars say

Where to find it Layout › Pages › Hide page

Pages can have their own names and can be hidden. Hidden pages remain in the document but are omitted from output. In a brochure, you can keep an unfinished draft while outputting the other pages. Binding can also sit at the top, for example for a calendar. The binding direction is part of document setup and page arrangement.

How to do it

  1. Select the page and open Layout › Pages › Name page …
  2. Enter a name and confirm it.
  3. Enable Layout › Pages › Hide page if needed.

Smart guides for equal spacing and sizes, a gap tool, guides as grids with gutters and to a tenth of a millimetre

Where to find it Create guides …

Smart guides show matching gaps and sizes relative to other objects as you move them. The gap tool edits the spaces within an arrangement. For a fixed type area, you can create guides as rows and columns with gutters and enter their positions numerically. You can use this to align a magazine page’s image frames to a shared grid. These aids support on-screen work and do not print as artwork in the PDF.

How to do it

  1. Enable View › Grids and guides › Smart guides.
  2. Open Create guides … through command search.
  3. Set rows, columns, gutters and the page or type-area reference.
  4. Move objects and watch the spacing indicators.

Outline view (⌘Y)

every object as a fine outline; find and grab hidden frames

Where to find it View › Outline (⌘Y)

Outline view shows all objects as fine outlines. Fills and image contents no longer obscure the frames behind them. On a crowded magazine page, you can find a hidden text frame and select its outline. The same command returns you to the normal display. Outline view changes only the screen display and leaves the PDF untouched.

How to do it

  1. Choose View › Outline or press ⌘Y.
  2. Click the outline of the frame you need.
  3. Turn Outline off again to inspect the result.

Split window

two views of the same document, each with its own zoom

Where to find it Window › Arrangement › Second view (⌥⌘2)

A second view shows the same document in an additional viewport. Each view has its own zoom and position. You can edit a paragraph at a large scale while keeping the whole spread visible beside it. Changes belong to the shared document and appear in both views. The split is an on-screen working aid and creates no additional output pages.

How to do it

  1. Choose Window › Arrangement › Second view.
  2. Set the position and zoom you want in each view.
  3. Toggle Second view again to close it.

Rotate spread

turn a spread by 90°, 180° or 270° for editing; output and document stay unchanged

Where to find it View › Rotate spread

You can rotate a spread by 90°, 180° or 270° for editing. This helps when working on sideways text or a rotated packaging panel. The spread stays centred in the view and the zoom is retained. Rotation affects only the view of that spread. Document geometry and output stay unchanged, so you do not need to reset the view before exporting a PDF.

How to do it

  1. Display the spread you want.
  2. Choose View › Rotate spread and the rotation you need.
  3. Choose Clear rotation in the same submenu to restore the normal view.

Limits: View rotation is unavailable while editing master pages.

Layers as a tree

expand and collapse groups, drag and hide objects inside, set layers and objects to “don't print”

Where to find it Layers

The layers panel shows layers, groups and objects in a tree. You can expand groups and move or hide their objects within the structure. This helps organise an advert containing several image and text groups. Layers and individual objects can also be marked as non-printing. These working elements remain visible during editing but are omitted from preview and PDF, PNG and SVG output.

How to do it

  1. Open the Layers panel.
  2. Expand the group and select or move its object.
  3. For a selected object, enable Do not print in Properties when needed.

Maths in every number field

10+5, 210/3, 2cm, 12pt

Number fields can evaluate arithmetic expressions and measurement units. You can enter 10+5 or 210/3 and use the result directly as a dimension. Values such as 2cm or 12pt are converted to the appropriate unit. For a three-column brochure, you can calculate a width without opening a calculator first. The field applies the calculated numeric value to the relevant layout setting.

How to do it

  1. Activate the number field in a panel or dialog.
  2. Enter an expression such as 210/3 or 2cm.
  3. Confirm the entry and check the applied value.

Faster placing

duplicate with offset, Alt-drag duplicates, align and distribute with fixed spacing

Where to find it Edit › Step and repeat … (⌥⇧⌘U)

Duplication and step-and-repeat create further copies of selected objects. Dragging with Alt held down also makes a copy. Alignment and distribution arrange several objects along a shared edge or with fixed spacing. For a row of product boxes, you can design one example and then arrange its repetitions. The copies are document objects and appear at their new positions in output.

How to do it

  1. Select the objects and open Edit › Step and repeat …
  2. Set the count and offset and confirm.
  3. Select the resulting objects and align or distribute them with the spacing you need.

Tips

  • Use Duplicate (⌥⇧⌘D) for a single copy.

A menu bar as on macOS, with Data, AI and What's New menus; the command search finds every menu item and understands trade terms

Where to find it Edit › Search command … (⌘↩)

The menu bar groups commands by work area and includes Data, AI and new features. Command search searches menu entries and also recognises stored trade terms. It shows matching commands with their shortcuts and runs the selected entry. In a print shop, you can enter the name of a rarely used setting and go straight to its command. Context-sensitive commands still require the appropriate selection or editing role.

How to do it

  1. Press ⌘↩ for Search command …
  2. Enter the command name or a suitable trade term.
  3. Select the matching entry and run it.
Compared

Command search

Vendor sources, as of 25.9.2026 · Full comparison with all sources

Tooltips everywhere, with shortcuts; switch them on or off and set the delay

Where to find it Edit › Settings … (⌘,) › General

Tooltips explain controls when you let the pointer rest over them. Where a shortcut exists, the hint shows it too. You can disable hints or adjust their delay. When learning an agency layout workflow, they help identify unfamiliar icons while you work. The default is 600 milliseconds, with a range from 0 to 2000 milliseconds in steps of 100.

How to do it

  1. Open Edit › Settings … and General.
  2. Turn Show tooltips on or off as needed.
  3. Set Delay and test a hint over a control.

Limits: Tooltips do not appear during touch interaction.

Your own keyboard shortcuts

record one per command and tool, conflicts show at once; export and import as a file, they belong to the person, not the document

Where to find it Edit › Keyboard shortcuts …

You can assign your own shortcuts to commands and tools. The dialog records the combination you press and names the previous command when a conflict occurs. Taking over a shortcut removes it from the previous command. In an agency, you can export your familiar shortcut set as a file and import it at another workstation. The bindings belong to you and do not change the document.

How to do it

  1. Open Edit › Keyboard shortcuts …
  2. Find the command and click its recording field.
  3. Press the combination and decide whether to take it over if already assigned.
  4. Use Export or Import … as needed.

Limits: Reserved browser or system combinations may be rejected; multi-stroke sequences are outside the scope.

Compared

Custom keyboard shortcuts

  • Medusa availableper command and tool, conflict warning, export and import as a file; per person in the browser
  • Adobe InDesign availablecustom shortcut sets, shareable↗ Adobe: Keyboard shortcuts
  • QuarkXPress no reliable statement
  • Affinity Studio no reliable statement

Vendor sources, as of 25.9.2026 · Full comparison with all sources

Command sequences

record recurring steps and play them back on the selection, a single undo step, as a file or in the document for the team

Where to find it Edit › Command sequences

Command sequences record recurring operations on a selection. They can contain supported commands, object properties, and paragraph and character settings. For product images, you can set fitting and stroke once and repeat them together later. The whole playback is a single undo step. A named sequence appears in command search and can be shared as a file or stored in the document for the team.

How to do it

  1. Choose Edit › Command sequences › Record command sequence.
  2. Perform the supported operations.
  3. Stop recording and save the sequence with a name.
  4. Select the target objects and play the sequence through command search.

Limits: Mouse movements and typing are not recorded; unsupported actions are skipped.

Five interface styles (Figma, Spectrum, Studio, Mac and Windows), each light and dark

Where to find it Interface

You can choose from five interface styles: Figma, Spectrum, Studio, Mac and Windows. Each supports light and dark appearance. Your choice affects the appearance of the controls. In an agency, this lets you adapt the working environment to your habits. It does not restyle page content or PDF output.

How to do it

  1. Open the menu on the Medusa logo.
  2. Choose the style under Interface.
  3. Under Appearance, choose Light, Dark or System.

Interface in German, English, French and Spanish, switch without reloading

Where to find it Sprache / Language

The interface is available in German, English, French and Spanish. Your choice affects the program’s menus, dialogs and labels. In a multilingual agency, each person can work in the interface language they need. Document text language and hyphenation are set separately in the document. When switching languages, the current implementation saves the choice and reloads the page.

How to do it

  1. Open the menu on the Medusa logo.
  2. Open Sprache / Language.
  3. Choose Deutsch, English, Français or Español.

Fast even at 500 pages

a keystroke takes about 33 ms to reach the screen, even in a 1000-page text flow it stays at 34 ms; the Enter key sends only the change (0.3 KB instead of 1.8 MB at 300 pages), large images zoom without stutter, thousands of objects can be dragged

The main project reports about 33 milliseconds from keystroke to screen in its 500-page stress test. For a 1000-page text flow, the release notes report 34 milliseconds per keystroke. At 300 pages, pressing Enter sends only the change at 0.3 kilobytes instead of 1.8 megabytes. For editing a long book, this reduces waiting during writing and collaboration. Zooming uses adapted image data for display, while export continues to use the original. Thousands of objects on a page can be moved, with spacing indicators drawn in the visible area.

Limits: The timings come from the described tests and are not fixed response times for every document.

On the phone

a slim view without panels or tools; page through and zoom, read and write comments, tap and change text, approve

On a phone, Medusa shows a reduced document view. You can page through, zoom, and read and write comments. With the appropriate rights, you can tap and edit text or approve pages. A client can correct brochure copy while travelling and leave feedback on the page. Panels and layout tools are omitted to leave space for the page.

How to do it

  1. Open the document or editorial link on your phone.
  2. Go to the page and use two fingers to zoom if needed.
  3. Long-press for a comment, or tap text with editing rights.
  4. Finish the correction with Done.

Limits: The phone view is for review and text corrections; phone layout tools are outside the scope.

Find objects

search and replace by fill, stroke, style, kind or layer, one object as a model selects all similar ones, on a swatch “Where used?” says which objects carry it

Where to find it Edit › Find and replace … (⌘F) › Object search

Object search finds frames by fill, stroke, object style, kind, layer or effect. You can select matches one by one or replace matching properties together. For a catalogue revision, you can find all frames sharing a stroke weight. A context menu lets an existing object serve as a model for selecting similar objects. On a swatch, Where used? selects affected objects and reports text locations using that colour.

How to do it

  1. Open Edit › Find and replace … and Object search.
  2. Set the criteria and Object scope.
  3. Review matches or use Select results.
  4. Set replacement values and click Replace results if needed.

Right-click a style

edit, redefine, duplicate or delete it, no detour through the panel

A style’s context menu offers editing, redefining, duplication and deletion. Redefining takes the selection’s overrides into the style. You can turn a headline treatment tried on the text into a shared magazine style. A duplicate provides a starting point for another section. Changes to the definition affect the places that use that style.

How to do it

  1. Select the text or object with the desired appearance if needed.
  2. Right-click the style.
  3. Choose Edit, Redefine, Duplicate or Delete.

Workspaces you can swap as a file, panels in tab groups, history with a jump to any step

Where to find it Window › Workspace

A workspace saves the arrangement of your panels. You can organise them in tab groups and share a named workspace as a file. An agency team can share a panel arrangement for catalogue production. The History panel shows steps since opening and lets you click back to an earlier state or forward again. A history jump changes the document’s editing state.

How to do it

  1. Arrange panels and choose Window › Workspace › Save workspace …
  2. Name the workspace.
  3. Choose Export workspace and the saved name.
  4. Load the file elsewhere with Import workspace …

Limits: History covers the current session since opening.

Folders in the document overview

your own filing with subfolders, drag documents in

Where to find it New folder …

The document overview offers personal folders with subfolders. You can drag documents into a filing location. An agency can organise clients, projects and issues in a hierarchy. The overview counts a folder’s documents together with those in its subfolders. Filing belongs to you and does not change pages or export data.

How to do it

  1. Open the document overview and choose New folder …
  2. Enter a name and choose a parent folder if needed.
  3. Drag the documents into it.

Limits: The folder hierarchy is limited to four levels.

Extensions

your own menu commands and panels from a manifest

Where to find it Window › Extensions › Manage extensions …

Extensions add custom menu commands and panels to Medusa. A manifest describes the name, program file, commands and an optional panel. An agency can collect recurring object-related tasks in its own controls. Once loaded, commands appear in the extensions menu and any included panel becomes available. The help entry for building extensions explains the interface and includes examples.

How to do it

  1. Open Window › Extensions › Manage extensions …
  2. Enter the Address of the manifest.
  3. Click Add and check the commands and panel.

Tips

  • Guide: Help › Writing extensions …
Compared

Scripting and extensions

Vendor sources, as of 25.9.2026 · Full comparison with all sources

Preferences just for you, Document Setup for everyone

page, grid, colour, typography, interactive

Where to find it File › Document setup … (⌥⌘P)

Personal preferences cover your working environment, including interface, units and tooltips. Document setup holds shared settings for pages, grids, colour, typography and interactive output. In an agency team, each person can choose their controls while everyone designs with the same document settings. Changes to shared settings belong to the document. For print dimensions or colour management, open document setup and check the relevant section.

How to do it

  1. For personal options, open Edit › Settings …
  2. For shared settings, open File › Document setup …
  3. Choose the section, change values and confirm the dialog.

Tips

  • Personal preferences: ⌘,.

The “Features in detail” example

30 pages in 15 chapters, every feature as an object to click

Where to find it Features in detail example

The Features in detail example contains 30 pages in 15 chapters. It groups features similarly to the menus and help and presents them as clickable layout objects. Charts and codes appear in different variants. For an agency team introduction, you can select objects and inspect their properties. The route to the relevant feature appears at the bottom of each page.

How to do it

  1. Open the examples on the start page.
  2. Choose Features in detail example.
  3. Go to a chapter, select an object and read the route at the bottom.
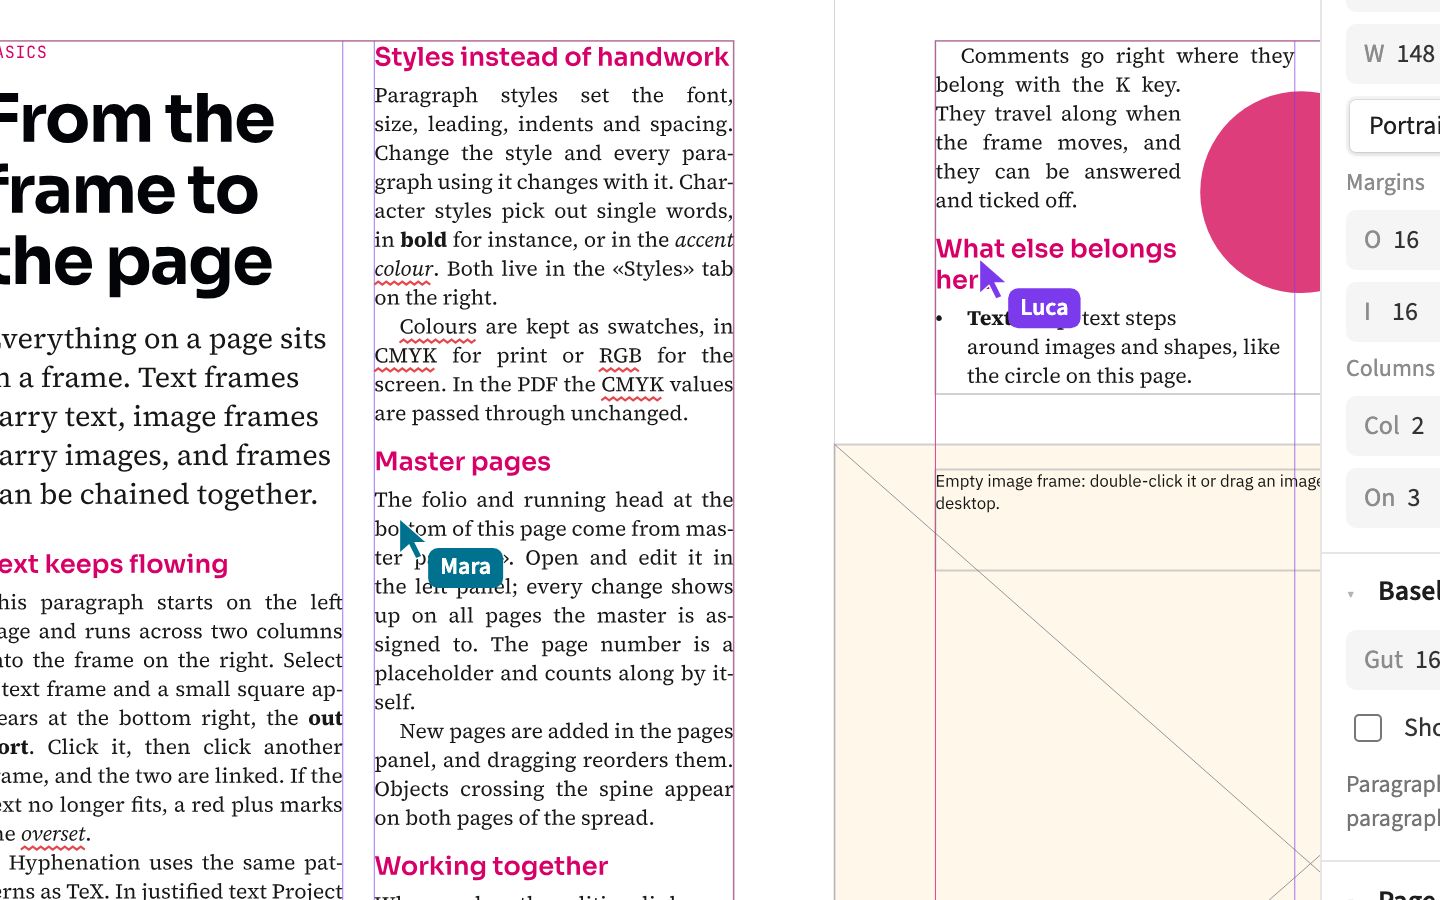
Account, rights & security

You assign the roles and manage your own account.

Clear rights

everyone sees their own documents, everything else goes through links with exactly the role you give, or through a team

Where to find it File › Share …

Each person sees their own documents and gains further access through an appropriate link or a team. Link roles distinguish editing, copy editing and approval, commenting, and viewing. For brochure corrections, you can let clients edit text and comment while the layout stays locked. A view link allows reading and export, and a comment link adds commenting. The role determines which operations are available in the document.

How to do it

  1. Open the document with editing rights and choose File › Share …
  2. Choose the link role appropriate to the task.
  3. Copy the corresponding link for the person concerned.

Sign-up with email confirmation, reset your own password

When creating a profile, you can confirm your email address through a link sent to you. Sign-in accepts your username or the email address on your account. If you forget your password, you can request a reset link from the sign-in page. This lets you restore your own access when working on a magazine. After setting the new password, sign in again and open your documents.

How to do it

  1. On the sign-in page, open “Forgot your password?”.
  2. Enter your username or email address and request the link.
  3. Open the email link, set a new password and sign in.

Limits: Resetting by email requires an email address on your account that has been confirmed.

Delete your own account, with an overview of what goes and a confirmation you cannot give by accident

Where to find it Delete account …

You can delete your own account through the menu under your name. The dialog first shows which of your documents are affected. You can hand those documents to another account or delete them with all images and versions. When leaving an agency, this lets you first check which work should remain. Other people’s documents you contributed to stay in place.

How to do it

  1. In the document overview, open the menu under your name and Delete account …
  2. Review the document list and choose transfer or deletion of your documents.
  3. Type your username and fill in Password.
  4. Read the consequences and use Delete account permanently only for the deletion you intend.

Limits: Deletion is permanent and cannot be undone.

Hand documents over to someone else, even when deleting an account, instead of deleting them along with it

Where to find it Transfer ownership …

You can transfer ownership of your document to another account. After the transfer, it appears for the new owner and leaves your own documents. Existing links remain valid, so the work does not need new links distributed. When responsibilities change in an agency, the next person can continue the brochure this way. You can also choose to hand documents over when deleting your own account.

How to do it

  1. Open your document’s menu in the overview.
  2. Choose Transfer ownership … and select the new owner under To which account?.
  3. Check the selection and confirm with Transfer.

Limits: Personal folders do not transfer; the document initially has no folder for the new owner.

Report ideas and bugs in the program

categorise, filter, thumbs up with a counter

Where to find it Ideas and bugs …

You can report ideas and bugs from within the program. The overview groups entries by type and status and provides search plus sorting by votes or date. A thumbs-up supports an existing request and shows the vote count. An agency can describe a recurring task as a feature request or report a bug with its reproduction steps. Without an account, a submission form is available, while the overview and voting require sign-in.

How to do it

  1. In the document overview, open the menu under your name and Ideas and bugs …
  2. Search for an existing entry and use the thumbs-up if appropriate.
  3. Choose Report an idea or a bug …, set the type and describe your suggestion or reproduction steps.

Licences and third-party works included, not just linked, with the full licence texts

Where to find it Help › Licences and third-party works …

The licence dialog shows Project Medusa’s licence and notices for included third-party works. Their rights holders and complete licence texts are available to read. The texts are supplied with the program. When documenting an agency workstation, you can look up the running version and its licence notices here. The dialog provides separate access to the program licence and the full licence texts of included works.

How to do it

  1. Choose Help › Licences and third-party works …
  2. Read the notices under Third-party works.
  3. Open Read the licence text or an entry under Full licence texts.